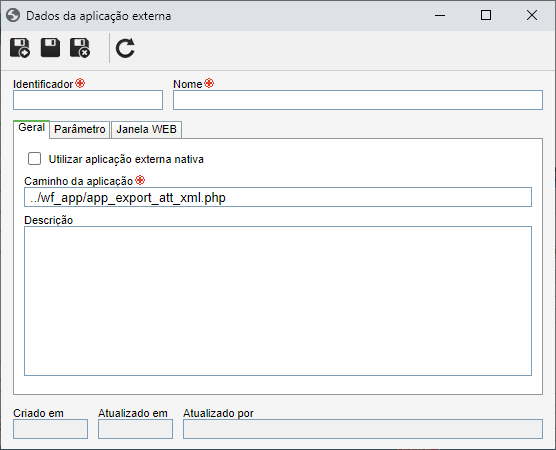
Creating an external application
Prerequisites:
Access to the Process > File >** Automation: External application
(PM042)** menu
On the PM042 file menu, all external applications that may be invoked during the execution of a process in the SoftExpert Workflow component must be created. These applications may be available both in the system environment and on the Internet, and are used to expand the platform's functionalities.
From version 2.1.3, the customized external applications that used to be in
the "web" folder ofSoftExpert Suite now must be in the "customization"
folder, maintaining the path structure to which they belonged. As an example, we
can mention the following folders:
/usr/local/se/web/wwwroot/workflow/wf_app/usr/local/se/web/wwwroot/workflow/wf_app
Considering that /usr/local/se is the path where SoftExpert Suite was
installed on your application server.
From version 2.1.3, these folders will be located at:
/usr/local/se/customization/web/wwwroot/workflow/wf_app/usr/local/se/customization/web/wwwroot/workflow/wf_app
Creating an external application
-
On the main screen toolbar, click on the
button.
-
Fill in the following fields on the data screen that will open:

- ID #: Enter a number or code for the external application.
- Name: Enter a name for the external application.
-
In the General tab, enter the general information about the external application:
- Use native external application: Enable this field to use the system's native applications. In this case, in the Native applications field, select the desired option. If this field is disabled, the following field will be displayed:
- Application path: Enter the full path where the external application is
located. For example:
"http://my-domain/login.php","d:\erp\contas.exe". - Description: Additional information about the external application.
-
Save the record after filling in the fields described so far, but do not close the data screen. At this point, the other tabs on the screen will be enabled.
-
In the Parameter tab, enter the parameters that can be passed when calling the external application. To do this, click on the
button from this tab and fill in the following fields on the screen that will be displayed:
- ID #: Enter the name of the parameter to be passed to the external application.
- Parameter is fixed for all calls: Check this field so that the parameter is fixed for all calls to the external application.
- Type: Set up whether the parameter value will be constant or variable.
- Constant value: If the previously selected parameter type is Constant, enter the value that will be passed to the external application.
- Description: Description for additional information about the parameter.
Save the parameter after filling in the fields above.
-
In the WEB Window tab, configure the properties of the screen, if the execution type is WEB. To do this, fill in the following fields:
- Positioning: Select the screen positioning at the time of the external application call (Center, Maximized, Upper left, or Customized). If you want to enter the screen coordinates manually, leave this field blank and fill in the X axis and Y axis fields (in pixels).
- Width / height: These fields will be enabled if, in the Positioning field, the Center, Upper left, or Customized option has been chosen. If that is the case, enter the Height and theWidth (in pixels) of the external application screen.
- X Axis / Y Axis: These fields will be enabled if, in the Positioning field, the Customized option has been selected. If that is the case, enter the position of the screen, through the X axis and theY axis fields (in pixels), and set the size of the external application screen through the Height and Width fields (in pixels).
- Button bar: Select this option to show the Internet browser's toolbar on the screen.
- Address bar: Select this option to show the Internet browser's address bar on the screen.
- Status bar: Select this option to show the status bar on the screen.
- Scrollbar: Select this option to show scroll bars (vertical and horizontal) on the screen.
- Menu: Select this option to show the menu on the screen.
- Resizing: Select this option if resizing the screen is allowed.
-
Save the external application record again.