Database configuration
LINUX
Microsoft SQL Server
This section covers the procedure for creating and configuring a database in SQL Server. To do that, follow the steps below:
Refer to the "SoftExpert Suite - System Requirements" document for more details on considerations about SQL Server.
Note: If the database version is SQL Server 2019, the database must have, at least, patch 15.04138 (CU11), according to the patch list at: https://sqlserverupdates.com/sql-server-2019-updates/. We highly recommend keeping database fix patches always up-to-date, as they may contain engine bug fixes.
This procedure assumes that SQL Server is correctly installed.
-
Open SQL Server Management Studio.
-
Connect to the server.
-
Right-click on Databases, then on New Database.
-
On the left side, General page, enter a name in Database name.
Example: sesuite
- On the left side, Options page, choose the 'collation' to be used, and click on OK.
The collations that can be used, in western languages, for the SoftExpert Suite database in SQL Server are:
-
SQL_Latin1_General_CP1_CI_AS
-
SQL_Latin1_General_CP1_CI_AI
-
Latin1_General_CI_AS
-
Latin1_General_CI_AI
The CI (Case Insensitive) collation parameter must always be used. We recommend using the AI (Accent Insensitive) parameter for new databases as of 2.0. For eastern languages, contact SoftExpert's support.
-
In the hierarchical tree, expand the Security item.
-
Right-click on Logins.
-
Click on New Login.
-
On the left side, General page, enter a name for the login in Login name.
Example: sesuite
-
Check the SQL Server authentication option.
-
In Password, enter a password, and confirm it in Confirm password.
-
Uncheck the Enforce password policy option.
-
In Default database, select the database created at steps 3 to 5.
-
In Default language, select English.
-
Go to the User Mapping page and, in Users mapped to this login, select the database created at steps 3 to 5.
-
In the Database Role membership box, check the following options:
- Public;
- db_owner.
- Click on OK.
IMPORTANT: The rules mentioned above are the only ones required for SoftExpert Suite to function; adding any other rules may result in security issues.
- Run these commands to apply a property required by the application in your database – ALLOW_SNAPSHOT_ISOLATION_ON property:
ALTER DATABASE <Database> SET ALLOW_SNAPSHOT_ISOLATION ON GO
- SET READ_COMMITTED_SNAPSHOT ON GO property.
ALTER DATABASE <Database> SET READ_COMMITTED_SNAPSHOT ON GO
IMPORTANT: The DEFAULT_SCHEMA of the application user must necessarily be the SQL Server "dbo" standard; otherwise, you will face issues while equalizing the database.
- Run this command to change the schema:
USE <Database>;
ALTER USER [user] WITH DEFAULT_SCHEMA = dbo;
Network configuration
The TCP/IP connection must be enabled in SQL Server Configuration Manager. To do that, follow the steps below:
-
Open SQL Server Configuration Manager.
-
In the hierarchical tree, expand the
SQL Server <version> Network Configurationitem. -
Click on Protocols for MSSQLSERVER.
-
In the right side box, right-click on TCP/IP.
-
Click on Properties.
-
From the Protocol tab, in Enable, select the value Yes.
-
Access the IP Addresses tab.
-
For each existing IP, in Enable, select Yes.
-
For each existing IP, check if the port specified in TCP Port is 1433.
-
Click on OK and restart the SQL Server service.
Oracle
Oracle configuration
This section covers the procedure for creating and configuring Schema in Oracle. To do that, follow the steps below:
This procedure assumes that Oracle is installed with instance created, and that TNSNames is properly configured in the server where SoftExpert Suite will be installed.
- Start SQLPlus:
sqlplus@<tnsnames>
- Connect to the server using a DBA user.
Creating tablespaces
- Create a tablespace named SOFTEXPERT_DATA:
CREATE TABLESPACE SOFTEXPERT_DATA LOGGING DATAFILE 'tablespaces_directory\SOFTEXPERT_DATA.DBF' SIZE 2000M AUTOEXTEND ON NEXT 200M MAXSIZE UNLIMITED;
Replace tablespaces_directory with the path where the tablespace must be
created on the Oracle server.
2000M is the initial recommended size for the data tablespace.
- Create a tablespace named SOFTEXPERT_INDEXES:
CREATE TABLESPACE SOFTEXPERT_INDEXES LOGGING DATAFILE 'tablespaces_directory\SOFTEXPERT_INDEXES.DBF' SIZE 200M AUTOEXTEND ON NEXT 50M MAXSIZE UNLIMITED;
Replace tablespaces_directory with the path where the tablespace must be
created on the Oracle server.
200M is the initial recommended size for the index tablespace.
Creating a user for SoftExpert Suite
- Create a user for SoftExpert Suite:
CREATE USER <user> PROFILE DEFAULT IDENTIFIED BY <password> DEFAULT TABLESPACE SOFTEXPERT_DATA ACCOUNT UNLOCK;
Replace <user> and <password> with your username and password, respectively.
- Set the required grants for the user created at step 5:
ALTER USER <user> QUOTA UNLIMITED ON SOFTEXPERT_DATA;
ALTER USER <user> QUOTA UNLIMITED ON SOFTEXPERT_INDEXES;
GRANT CREATE SESSION TO <user>;
GRANT CREATE TABLE TO <user>;
GRANT CREATE VIEW TO <user>;
GRANT CREATE SEQUENCE TO <user>;
GRANT CREATE PROCEDURE TO <user>;
GRANT CREATE TRIGGER TO <user>;
- Exit SQLPlus.
exit
PostgreSQL
This section covers the procedure for creating and configuring PostgreSQL. To do that, follow the steps below:
Refer to the "SoftExpert Suite - System Requirements" document for more details on considerations about PostgreSQL.
To perform the following procedure, make sure that the postgres service is stopped; if it is not, stop it:
pg_ctl stop -D postgresql_installation_directory/data
- Edit the pg_hba.conf configuration file:
vi postgresql_installation_directory/data/pg_hba.conf
- Locate the IPv4 local connections configuration block and add a new line with the network data of the server where SoftExpert Suite is being installed:
# IPv4 local connections:
host    all   all   127.0.0.1/32     md5
host    all   all   192.168.200.55 255.255.255.0   md5
- Save and close the configuration file:
:wq!
- Edit the postgresql.conf configuration file:
vi postgresql_installation_directory/data/postgresql.conf
- Find the listen_addresses parameter, uncomment the line and change its value, as shown below:
listen_addresses = '*' # what IP address(es) to listen on;
- Save and close the configuration file:
:wq!
Creating folders for the tablespaces
- Create 2 folders (softexpert_data and softexpert_indexes) with full permission for the postgres user. Create the following directories for the tablespaces:
mkdir postgresql_installation_directory/data/tbs
mkdir postgresql_installation_directory/data/tbs/softexpert_data
mkdir postgresql_installation_directory/data/tbs/softexpert_indexes
It is not allowed to create and use tablespaces with duplicated names, as it may cause slowness in the application.
- Set the permissions:
chown postgres.postgres -R postgresql_installation_directory/data/tbs
User and permissions
PostgreSQL is case-sensitive.
- Start PSQL with the postgres user created when PostgreSQL was installed:
psql -U postgres -h localhost -d postgres
- Create a user for SoftExpert Suite:
CREATE ROLE <user> LOGIN ENCRYPTED PASSWORD '<password>' SUPERUSER VALID UNTIL 'infinity';
Replace <user> and <password> with your username and password, respectively.
Tablespaces
- Create a tablespace named SOFTEXPERT_DATA:
CREATE TABLESPACE "SOFTEXPERT_DATA" OWNER <user> LOCATION 'postgresql_installation_directory/data/tbs/softexpert_data';
- Create a tablespace named SOFTEXPERT_INDEXES:
CREATE TABLESPACE "SOFTEXPERT_INDEXES" OWNER <user> LOCATION 'postgresql_installation_directory/data/tbs/softexpert_indexes';
Database
- Create the database for SoftExpert Suite:
CREATE DATABASE <database_name> WITH ENCODING='UTF8' OWNER=<user> tablespace="SOFTEXPERT_DATA";
Encoding UTF8 supports all languages.
Starting and stopping the PostgreSQL service
- To start the PostgreSQL service:
su - postgres
pg_ctl start -D postgresql_installation_directory/data
logout
- To stop the PostgreSQL service:
su - postgres
pg_ctl stop -D postgresql_installation_directory/data
logout
You can create a script to start and stop the PostgreSQL service. See below the steps needed to create a startup script for PostgreSQL.
Creating the startup script
The steps for creating a startup script are described below. If you want to use a script, follow the example below, changing the directories in accordance with the data of your installation environment.
- Access the directory where the system services are stored:
cd /etc/init.d
- Create a file named postgresql and open it for editing:
vim postgresql
- Paste the content below to the file, changing information in accordance with your environment:
#!/bin/sh

# description: PostgreSQL Server

# chkconfig: 2345 80 30

# processname: postgresql

case "$1" in

 "start")

 echo "Starting PostgreSQL Server"
 sudo -u postgres postgresql_installation_directory/bin/pg_ctl start -D postgresql_installation_directory/data

 ;;

 "stop")

 echo "Stopping PostgreSQL Server"
 sudo -u postgres postgresql_installation_directory/bin/pg_ctl stop -D postgresql_installation_directory/data

 ;;

 "restart")

 /etc/init.d/postgresql stop
 /etc/init.d/postgresql start

 ;;

 *)
 echo "Usage: $0 {start|stop|restart}"
 ;;

 esac
- Save and close the file:
:wq!
- After installing the service, set the execution permission for the PostgreSQL startup script:
chmod +x /etc/init.d/postgresql
- Set up the script to start automatically with the operating system:
- For distributions based on CentOS/RedHat/OracleLinux, execute:
chkconfig --add postgresql
chkconfig --level 235 postgresql on
- For Debian-based distributions, execute:
update-rc.d postgresql defaults
PostgreSQL - TLS
This section will cover the configuration procedure for TLS certificates in PostgreSQL.
This optional procedure is meant for enabling the TLS certificate with PGSQL while SoftExpert Suite is installed, on both Windows Server and Linux.
SSL/TLS connections work as a security layer by encrypting data that moves between the customer and a database instance. The use of a server certificate provides an extra security layer by validating whether connection is being established in accordance with the database instance.
To obtain the certificate, it is first necessary to purchase a digital certificate. After that, the issuer will make it available.
To configure the TLS certificate in PostgreSQL, take the following steps:
- Access the database server that will be used and check the following parameters in the postgresql_installation_directory /data/postgresql.conf file:
sudo vi postgresql_installation_directory/data/postgresql.conf
ssl = on
ssl_ca_file = 'certificado_client.crt'
ssl_cert_file = 'certificado_server.crt'
ssl_key_file = 'chave_certificado_server.key'
Description:
certificado_client.crt: The certificate signed by the CA and used in the application for database connection.certificado_server.crt: The database certificate.chave_certificado_server.key: The database certificate key.
Make sure the certificate files are all in the postgresql_installation_directory/date folder.
- Execute the following commands to add permissions to the files:
sudo chmod 400 <certificate_server.key>
sudo chown postgres.postgres <certificate_server.key>
- Add the following line to the postgresql_installation_directory data/pg_hba.conf file:
hostssl all all 0.0.0.0/0 md5
- Restart the PostgreSQL service.
sudo /etc/init.d/postgresql restart
- Use the procedure described in the installation guide to continue.
For more information on using the SSL/TLS certificate, go to: https://www.postgresql.org/docs/12/ssl-tcp.html
If the certificate does not match your database version, check which version corresponds to yours.
WINDOWS
Microsoft SQL Server
This section covers the procedure for creating and configuring a database in SQL Server. To do that, follow the steps below:
Refer to the "SoftExpert Suite - System Requirements" document for more details on considerations about SQL Server.
Note: If the database version is SQL Server 2019, the database must have, at least, patch 15.04138 (CU11), according to the patch list at: https://sqlserverupdates.com/sql-server-2019-updates/. We highly recommend keeping database fix patches always up-to-date, as they may contain engine bug fixes.
This procedure assumes that SQL Server is correctly installed.
-
Open SQL Server Management Studio.
-
Connect to the server.
-
Right-click on Databases, then on New Database.
-
On the left side, General page, enter a name in Database name.
Example: sesuite
- On the left side, Options page, choose the 'collation' to be used, and click on OK.
The collations that can be used, in western languages, for the SoftExpert Suite database in SQL Server are:
-
SQL_Latin1_General_CP1_CI_AS
-
SQL_Latin1_General_CP1_CI_AI
-
Latin1_General_CI_AS
-
Latin1_General_CI_AI
The CI (Case Insensitive) collation parameter must always be used. We recommend using the AI (Accent Insensitive) parameter for new databases as of 2.0. For eastern languages, contact SoftExpert's support.
-
In the hierarchical tree, expand the Security item.
-
Right-click on Logins.
-
Click on New Login.
-
On the left side, General page, enter a name for the login in Login name.
Example: sesuite
-
Check the SQL Server authentication option.
-
In Password, enter a password, and confirm it in Confirm password.
-
Uncheck the Enforce password policy option.
-
In Default database, select the database created at steps 3 to 5.
-
In Default language, select English.
-
Go to the User Mapping page and, in Users mapped to this login, select the database created at steps 3 to 5.
-
In the Database Role membership box, check the following options:
- Public;
- db_owner.
-
Click on OK.
-
Run these commands to apply a property required by the application in your database – ALLOW_SNAPSHOT_ISOLATION_ON property:
ALTER DATABASE <Database> SET ALLOW_SNAPSHOT_ISOLATION ON GO
- SET READ_COMMITTED_SNAPSHOT ON GO property.
ALTER DATABASE <Database> SET READ_COMMITTED_SNAPSHOT ON GO
IMPORTANT: The DEFAULT_SCHEMA of the application user must necessarily be the SQL Server "dbo" standard; otherwise, you will face issues while equalizing the database.
- Run this command to change the schema:
USE <Database>;
ALTER USER [user] WITH DEFAULT_SCHEMA = dbo;
Oracle
Oracle configuration
This section covers the procedure for creating and configuring an Oracle database. To do that, follow the steps below:
This procedure assumes that Oracle is installed with instance created, and that TNSNames is properly configured in the server where SoftExpert Suite will be installed.
-
Start SQLPlus.
-
Connect to the server using a DBA user.
Creating tablespaces
- Create a tablespace named SOFTEXPERT_DATA:
CREATE TABLESPACE SOFTEXPERT_DATA LOGGING DATAFILE 'tablespaces_directory\SOFTEXPERT_DATA.DBF' SIZE 2000M AUTOEXTEND ON NEXT 200M MAXSIZE UNLIMITED;
Replace tablespaces_directory with the path where the tablespace must be
created on the Oracle server.
2000M is the initial recommended size for the data tablespace.
- Create a tablespace named SOFTEXPERT_INDEXES:
CREATE TABLESPACE SOFTEXPERT_INDEXES LOGGING DATAFILE 'tablespaces_directory\SOFTEXPERT_INDEXES.DBF' SIZE 200M AUTOEXTEND ON NEXT 50M MAXSIZE UNLIMITED;
Replace tablespaces_directory with the path where the tablespace must be
created on the Oracle server.
200M is the initial recommended size for the index tablespace.
Creating a user for SoftExpert Suite
-
To create a user for SoftExpert Suite and set the necessary permissions, take the following steps:
-
Create a user for SoftExpert Suite:
CREATE USER <SESUITE> PROFILE DEFAULT IDENTIFIED BY <PASSWORD> DEFAULT TABLESPACE SOFTEXPERT_DATA ACCOUNT UNLOCK;
Replace <SESUITE> and <PASSWORD> with your username and password, respectively.
- Set the required grants for the user created at step 5:
ALTER USER <user> QUOTA UNLIMITED ON SOFTEXPERT_DATA;

ALTER USER <user> QUOTA UNLIMITED ON SOFTEXPERT_INDEXES;

GRANT CREATE SESSION TO <user>;

GRANT CREATE TABLE TO <user>;

GRANT CREATE VIEW TO <user>;

GRANT CREATE SEQUENCE TO <user>;

GRANT CREATE PROCEDURE TO <user>;

GRANT CREATE TRIGGER TO <user>;

GRANT select_catalog_role to <user>;
-
Exit SQLPlus.
-
Click on the Windows Start menu.
-
Right-click on My Computer and select Properties.
-
Go to the Advanced tab and click on Environment.
-
In System Variables, click on New.
-
Fill in the Variable Name field with NLS_LANG.
-
Open SQLPlus.
-
Type in the following commands for the NLS parameters to return:
- VALUE1:
SELECT VALUE FROM NLS_SESSION_PARAMETERS WHERE PARAMETER = 'NLS_LANGUAGE';
- VALUE2:
SELECT VALUE FROM NLS_SESSION_PARAMETERS WHERE PARAMETER = 'NLS_TERRITORY';
- VALUE3:
SELECT VALUE FROM NLS_DATABASE_PARAMETERS WHERE PARAMETER = 'NLS_CHARACTERSET';
- Fill in the Variable Value field with the information returned by SQLPlus, and in the order from the previous step: VALUE1_VALUE2.VALUE3
Example: AMERICAN_AMERICA.WE8MSWIN1252
-
Click on OK.
-
Click on OK to close the System properties screen.
-
Exit SQLPlus.
PostgreSQL
This section covers the procedures for creating and configuring the database for PostgreSQL DBMS. First, it will present the PostgreSQL and pgAdmin III installation procedures.
Refer to the "SoftExpert Suite - System Requirements" document for more details on considerations about PostgreSQL.
To use the SoftExpert Capture indexing service, after installing PostgreSQL, you must install PostgreSQL Native OLEDB Provider (pgoledb.msi) on the SoftExpert Suite server. After the installation, update the PATH environment variable with the PostgreSQL Native OLEDB Provider installation directory.
Installing PostgreSQL
To install PostgreSQL, follow the steps below:
-
Download PostgreSQL from: http://www.postgresql.org.
-
Execute the PostgreSQL installation file.
-
On the Welcome to the PostgreSQL Setup Wizard screen, click Next.
-
In Installation Directory, choose a directory for the installation or keep the default path.
-
In Data Directory, enter the directory where data will be stored. Click on Next.
-
Enter a password for the database superuser and the service account (postgre). Click on Next.
-
Enter the port on which the service is running. Click on Next.
-
Use the default locale. Click on Next.
-
On the Ready to install screen, click Next.
-
Uncheck the Launch Stack Builder at exit option.
-
Click on Finish.
Installing pgAdmin III
To install pgAdmin III, take the following steps:
This procedure must be performed on the server where SoftExpert Suite will be installed.
-
Download pgAdmin III from: http://www.pgadmin.org/download.
-
Execute the installation file and follow the software instructions.
-
Open pgAdmin III.
-
Click on the Add a connection to a server button to add a connection to the database server.
-
In Name, enter the connection name.
-
Enter the name of the database server host.
-
In Port, enter the PostgreSQL port. The default port is 5432.
-
Select the database for connection.
View all the databases only after the first connection.
-
Enter user name and password.
-
Click on OK.
PostgreSQL network configuration
This section covers the procedure for creating and configuring the database in PostgreSQL. To configure the PostgreSQL network, take the following steps:
- Access the PostgreSQL directory that contains the configuration files.
Example: C:\Program Files\PostgreSQL\8.x\data
-
Open the pg_hba.conf configuration file for editing.
-
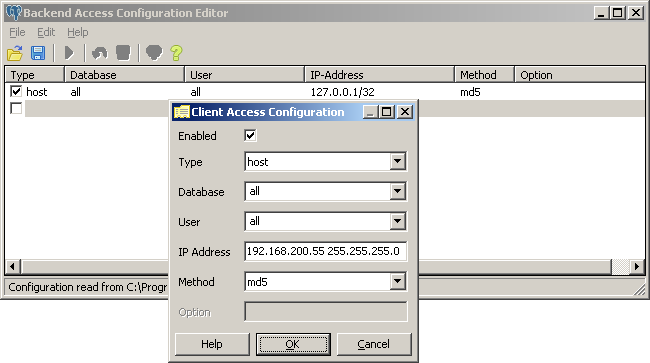
Find the 'IPv4 local connections' configuration block and add a new line with the network data of the server where SoftExpert Suite is being installed:
# IPv4 local connections:
host    all   all   127.0.0.1/32     md5
host    all   all   192.168.200.55 255.255.255.0   md5
- This file can also be configured through pgAdmin III (File arrowrgray open pg_hba.conf menu), as shown in the image below:
-
Save and close the configuration file.
-
Open the postgresql.conf configuration file for editing:
-
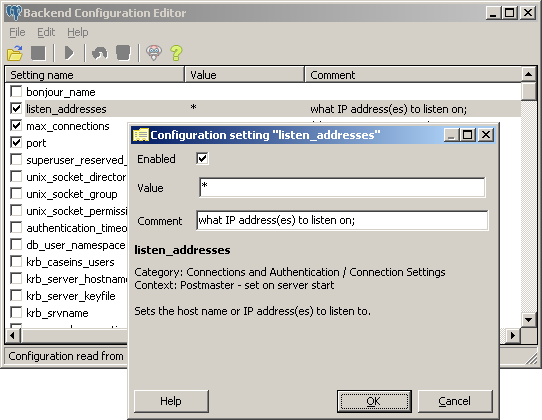
Find the listen_addresses parameter and change its value, as shown below:
listen_addresses = '*' # what IP address(es) to listen on;
- This file can also be configured through pgAdmin III (File arrowrgray open postgresql_hba.conf menu), as shown in the image below:
-
Save and close the configuration file.
-
Restart the PostgreSQL service.
Creating tablespace folders
To create the folders for the tablespace, take the following steps:
- Access the PostgreSQL directory where the folders will be created or use the PostgreSQL default data folder.
Example: C:\Program Files\PostgreSQL\8.x\data
- In the accessed directory, create a new folder named SOFTEXPERT_DATA.
Example: C:\Program Files\PostgreSQL\8.x\data\SOFTEXPERT_DATA
- In the accessed directory, create a new folder named SOFTEXPERT_INDEXES.
Example: C:\Program Files\PostgreSQL\8.x\data\SOFTEXPERT_INDEXES
- Right-click on the parent folder.
Example: C:\Program Files\PostgreSQL\8.x\data
-
Select Properties.
-
Go to the Security tab.
-
Select the PostgreSQL service user.
-
From the Allow column, grant this user Full control permission.
-
Click on OK.
Creating a user for SoftExpert Suite
To create a user, take the following steps:
-
Open the pgAdmin III assistant.
-
On the left side, in the Object Browser menu, select the default server and connect to it.
-
Right-click on Login Roles and select New Login Role.
-
On the New Login Role screen that will open, fill in the following fields:

-
Role name: Enter a name for the new user.
-
Password: Enter the password for the new user.
-
Password (again): Retype the password to confirm it.
-
Account expires: If necessary, enter the date on which the account being created will expire.
-
Still on the user creation screen, go to the Role privileges tab and select Superuser.
-
Click on OK.
Creating tablespaces
To create a tablespace, take the following steps:
-
Right-click on Tablespaces.
-
Select New Tablespace and, on the screen that opens, complete the following fields:

-
Name: Type SOFTEXPERT_DATA for the tablespace name.
-
Location: Enter the directory for the SOFTEXPERT_DATA tablespace folder. Example: C:\Program Files\PostgreSQL\8.x\data\SOFTEXPERT_DATA.
-
Owner: Select the user created for SoftExpert Suite. Example: sesuite.
-
Still on the tablespace creation screen, go to the Privileges tab.
-
Select the CREATE option and click on Add/Change.
-
Click on OK.
Repeat this process to create the SOFTEXPERT_INDEXES tablespace.
Creating databases
To create a database, take the following steps:
-
Right-click on Databases.
-
Select New Database and, on the screen that opens, complete the following fields:

-
Name: Enter a name for the database.
-
Owner: Select the user previously created for SoftExpert Suite.
-
Encoding: Select UTF8.
-
Tablespace: Select SOFTEXPERT_DATA to be the default tablespace.
The recommended database encoding is UTF-8 because it supports all languages.
-
Still on the database creation screen, go to the Privileges tab and select ALL.
-
Click on Add/Change.
-
Click on OK.
-
Close pgAdmin III.
PostgreSQL - TLS
This section will cover the configuration procedure for TLS certificates in PostgreSQL.
This optional procedure is meant for enabling the TLS certificate with PGSQL while SoftExpert Suite is installed, on both Windows Server and Linux.
SSL/TLS connections work as a security layer by encrypting data that moves between the customer and a database instance. The use of a server certificate provides an extra security layer by validating whether connection is being established in accordance with the database instance.
To obtain the certificate, it is first necessary to purchase a digital certificate. After that, the issuer will make it available.
To configure the TLS certificate in PostgreSQL, take the following steps:
- Access the database server that will be used and check the following parameters in the postgresql_installation_directory/data/postgresql.conf file:
ssl = on
ssl_ca_file = 'certificado_client.crt'
ssl_cert_file = 'certificado_server.crt'
ssl_key_file = 'chave_certificado_server.key'
Description:
certificado_client.crt: The certificate used by the application for connection to the database.certificado_server.crt: The database certificate.chave_certificado_server.key: The database certificate key.
Make sure the certificate files are all in the postgresql_installation_directory/date folder.
- Add the following line to the postgresql_installation_directory/data/pg_hba.conf file:
hostssl all all 0.0.0.0/0 md5
-
Restart the PostgreSQL service.
-
Use the procedure described in the installation guide to continue.
For more information on using the SSL/TLS certificate, go to: https://www.postgresql.org/docs/12/ssl-tcp.html
If the certificate does not match your database version, check which version corresponds to yours.