Executing the installation
In this step, some Windows dependencies will be enabled, and the server will have to be restarted; for this reason, check if there is any important service or process that may generate issues if the server is restarted.
REMEMBER TO CARRY OUT ALL VALIDATIONS CONTAINED IN THE PREREQUIRED ACTIVITIES DOCUMENT.
IMPORTANT
- During this process, you will need to restart your operating system.
- Make sure the server can be restarted because, if there are other services running, they will be affected by the restart.
- Run the installation script.
C:\sesuite\sesuite.ps1 install
- The installation will download several dependencies. Afterwards, the machine will have to be restarted; to this end, write the word 'yes' in the console when prompted and press Enter.

If your environment is set up with the AllSigned execution policy, follow the
steps described in our
Secure script signing
guide.
- After restarting the machine, search for Windows PowerShell again, as described above, and run the same script from the previous step.
C:\sesuite\sesuite.ps1 install
- Wait for the dependencies to be installed.

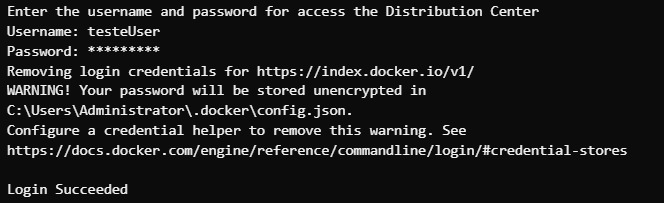
In this next step, you will be asked to enter your access data on the SoftExpert Distribution Center platform; enter your username and password in the steps below:
If you are using an internal registry, refer to the Registry Usage Guide in the installation topic before moving on.
- Type the database connection configurations in the console when prompted.
In this step, select one of the 3 available databases by entering its corresponding number (1, 2 or 3).
What is your database? [1-sqlserver 2-postgresql 3-oracle]:
Now, enter the full name of the URL that will be used to access SoftExpert Suite. This URL can be a DNS domain or a DNS subdomain. It can be a private URL, for internal access exclusively, or a public URL with TLD (Top Level Domain). It is important to note that the defined URL must be in lowercase letters and cannot be the hostname or IP of the environment.
Enter the value for domain:
In this field, enter an internal name to reference this connection (just a name for reference).
Enter the value for connectionName:
Enter here the database access user's name.
Enter the value for databaseUser:
Enter here the database access user's password; when it is typed, for security reasons, it will be replaced with *.
Enter the value for databasePassword:
[For connections to Oracle database only] Enter the tnsnames.ora content.
Example tnsnames.ora: BASE =
(DESCRIPTION=(ADDRESS=(PROTOCOL=TCP)(HOST={host})(PORT={port}))(CONNECT_DATA=(SERVER=DEDICATED)(SERVICE_NAME={SERVICE_NAME})))
Enter the value for tnsnames.ora:
[For connections to PostgreSQL or Oracle database only] Enter the Data Tablespace name.
Enter the value for tableSpaceData:
[For connections to PostgreSQL or Oracle database only] Enter the Indexes Tablespace name.
Enter the value for tableSpaceIndexes:
[For connections to Oracle database only] Enter the TNS content.
Enter the value for tns:
[For connections to the SQL Server database only] If a SoftExpert Suite TLS connection is used for the database, write y; otherwise,n.
Will TLS 1.2 be used to connect to SQL Server? (y/n):
[For connections to the SQL Server database only] - If connection to a named instance is used, the name of the instance must be provided below. If a named instance is not used, just leave the field blank and press Enter.
Enter the value for instance:
In this step, enter the database address, which may be an IP or a DNS address, depending on the local configuration that is available.
Enter the value for server:
Enter here the name of the database that will be used by SoftExpert Suite.
Enter the value for db:
In this step, enter the database port number; if the default entered is the right one, just press Enter.
For the SQL Server database, the default is 1433; for PostgreSQL, it is 5432, and Oracle uses 1521.
Enter the value for port (If not provided the default values will be used: 1433|5432|1521):
If you want to add another domain to access the application, select yes;
Are you going to use 2 or more domains to access the SE Suite application?
After adding the host, you will be asked if another host will be added. If you want to add, select "yes"; otherwise, select "no".
After the previous steps are successfully finished, the following message will be displayed:
Database successfully added
- At the following step, you will be asked which SoftExpert version you want to install. The latest available version will appear between brackets, but a different one can be specified, if you want. If an invalid or unavailable version is entered, the question will be asked again.
Enter the desired SoftExpert Suite version (Latest Version: xxxxxx):
- In this step, enter the time zone used by SoftExpert Suite.
In the example for the default value, "America/Sao_Paulo" is used.
It is important that you enter the exact value from a list of accepted values; check the list at: https://timezonedb.com/time-zones
Enter the desired SoftExpert Suite timezone (Default: America/Sao_Paulo):
- Specify how much memory will be dedicated to the container and how many processor cores will be divided for the container. If you want to use the minimum of both, just press Enter when requested.
Note: In the Task Manager, check how many cores and GB of memory the server has. It is important for this configuration to be decided on between the system administrator and the customer, as it depends on how many users SoftExpert Suite will have and how much of the application will be used.
REFER TO THE SYSTEM REQUIREMENTS FOR INFORMATION ABOUT SIMULTANEOUS USERS
- Moreover, if you want to use the CA certificate or a custom self-signed one, select y to configure it.
USING THE CERTIFICATE IS RECOMMENDED.
- The installer will also ask if you want to use a private/internal DNS service. If there is an internal and/or private DNS server in your company, its IP must be entered so that the container can resolve the domains of the other services on the local network. In this context, if you want to configure the DNS server, just select 'y' and enter the server IP.
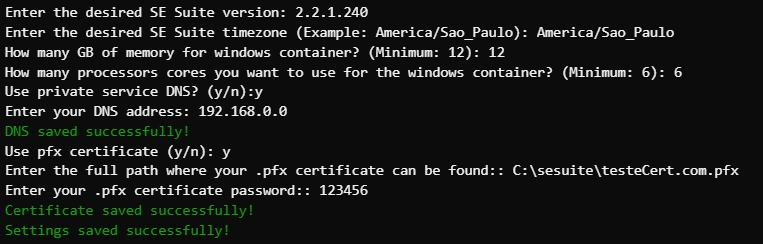
Note: Enter the full certificate path together with the '.pfx' extension. The installation uses ".pfx" files only.
It is worth stressing that every production environment must have a valid certificate, issued by a certificate authority. The installation provides a self-signed certificate in order for the application to work temporarily, but it must be changed to a valid one. A digital certificate is a document that aims to ensure the encrypting of communication and connection to a website, as well as to validate its integrity. It is usually a padlock symbol on websites.
It is important to highlight that the configuration of a signed certificate is necessary to guarantee the functioning of mobile applications.
YouTube example:
