Workstation configuration
This section will cover the necessary configurations for the workstation. It contains the following main topics:
The activities in this section must be performed on all workstations that will access SoftExpert Suite.
Configuration for using Firefox
Check that the settings in Firefox are in accordance with the minimum recommended for the operation of SoftExpert Suite on workstations:
Attention!
Firefox is not accepted for SoftExpert Suite. For more details, see the System Requirements.
-
Open Firefox and go to Tools > Options from the menu bar.
-
From the Contenttab, in Block pop-up windows, click on the Exceptions button.
-
Type the SoftExpert Suite domain and click on the Allow button.
-
Click on Close to close this screen, and then click on OK to close the Options screen.
-
From the Firefox menu bar, click on Tools > Add-ons.
-
Access the Plugins tab and check whether the Java plugin is installed and enabled.
Configuration for using Internet Explorer
This section presents the configurations that will be required for the workstations that will use one or more SoftExpert Suite components. It is possible to set these configurations automatically by configuring GPOs.
Safe Websites
Automatic Mode (GPO)
-
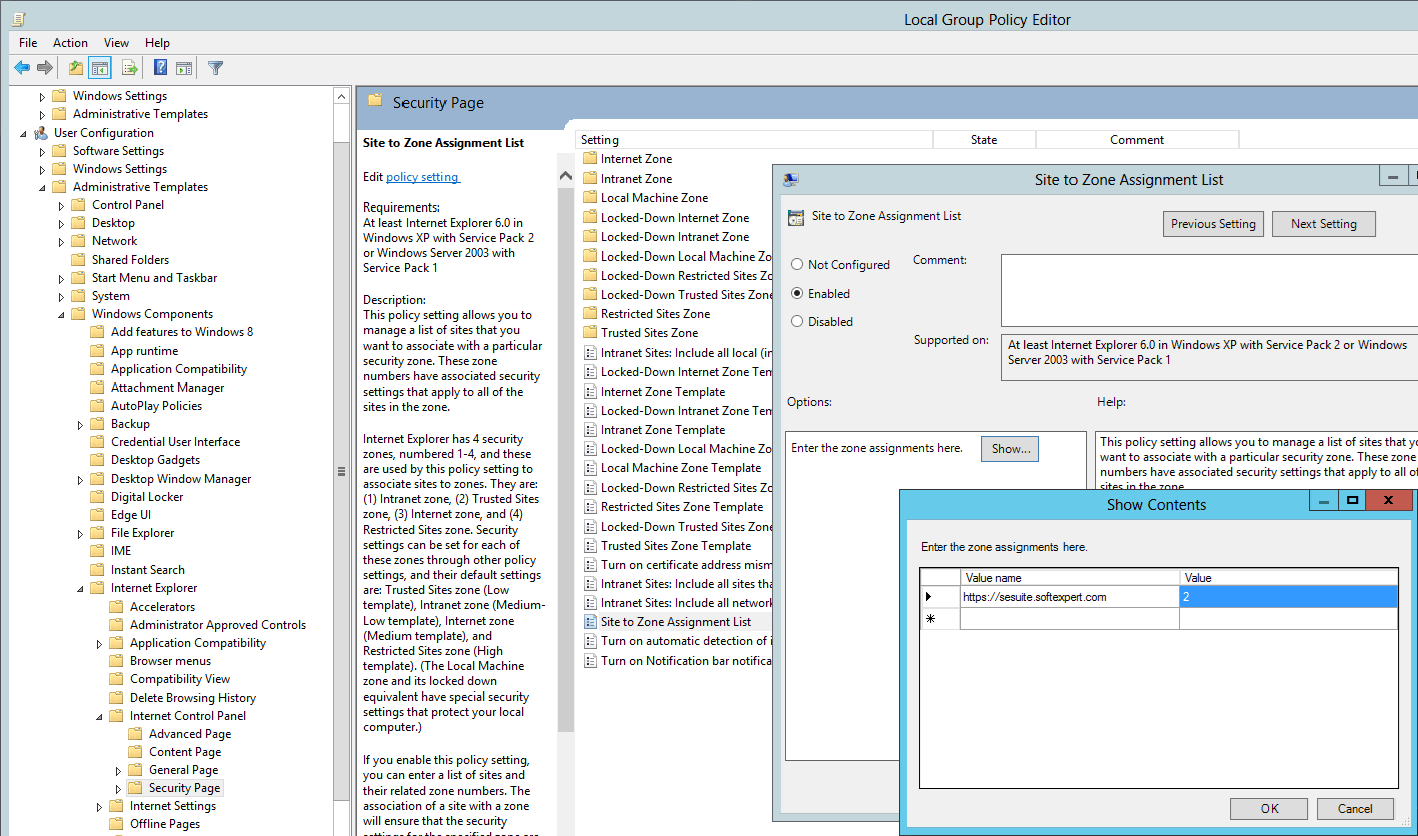
Open Group Policy Management, then go to "User Configuration > Administrative Templates > Windows Components > Internet Explorer > Internet Control Panel > Security Page".
-
Set "Site to Zone Assignment List" to "Enable".
-
Click on "Show" and then on "Add".
-
Type the SoftExpert Suite access URL in the first line. For example, https://sesuite.softexpert.com.
-
Type 2 in the second line and click on "OK" to finish.
-
Open "Group Policy Management", then go to "User Configuration > Administrative Templates > Windows Components > Internet Explorer > Internet Control Panel > Security Page".
-
Set "Site to Zone Template" to "Enable".
-
In "Options", set "Trusted Sites" to "Low".
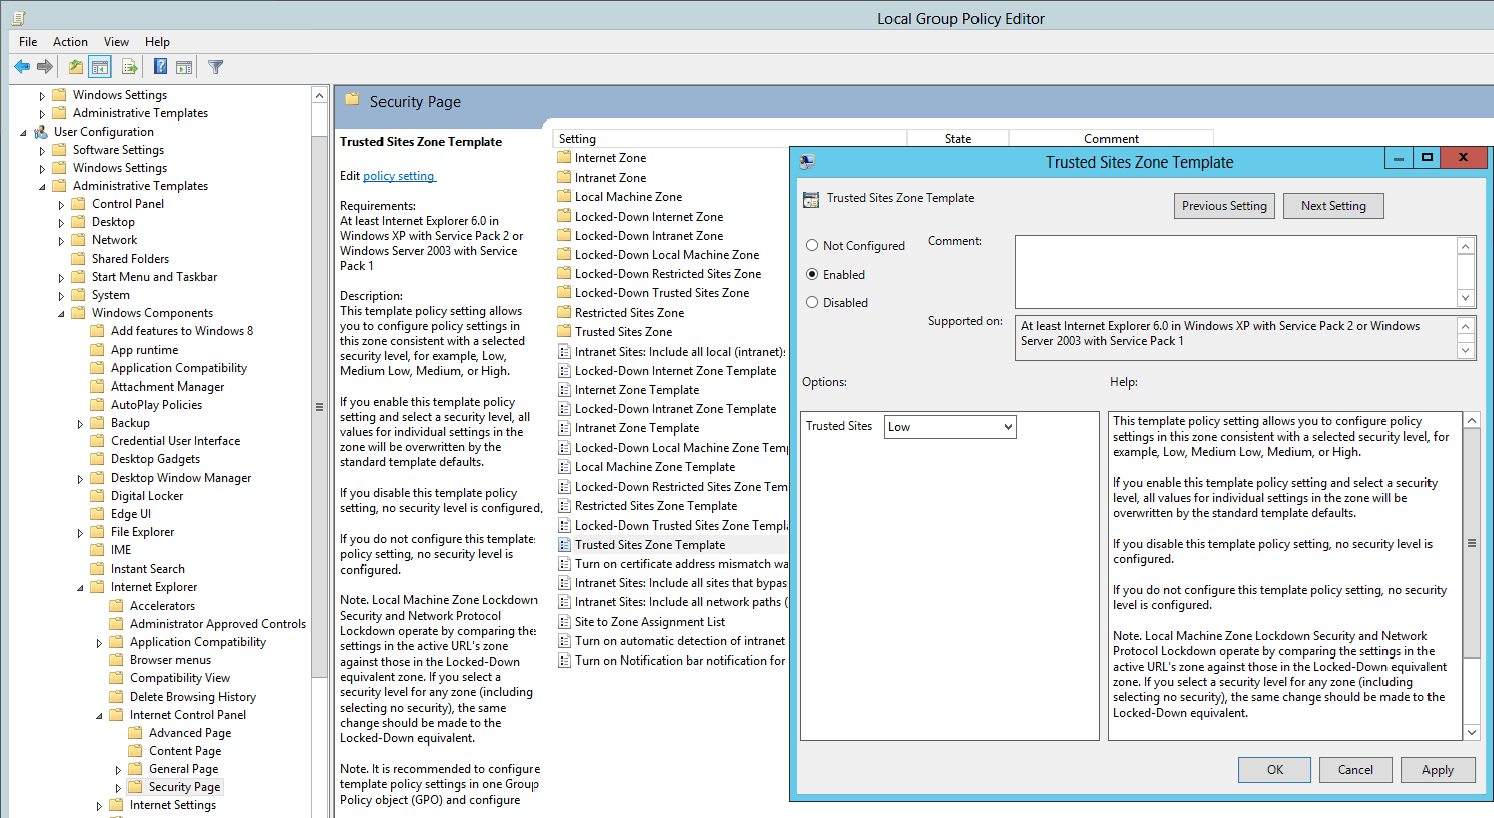
- Click on "OK" to finish.
Manual Mode
-
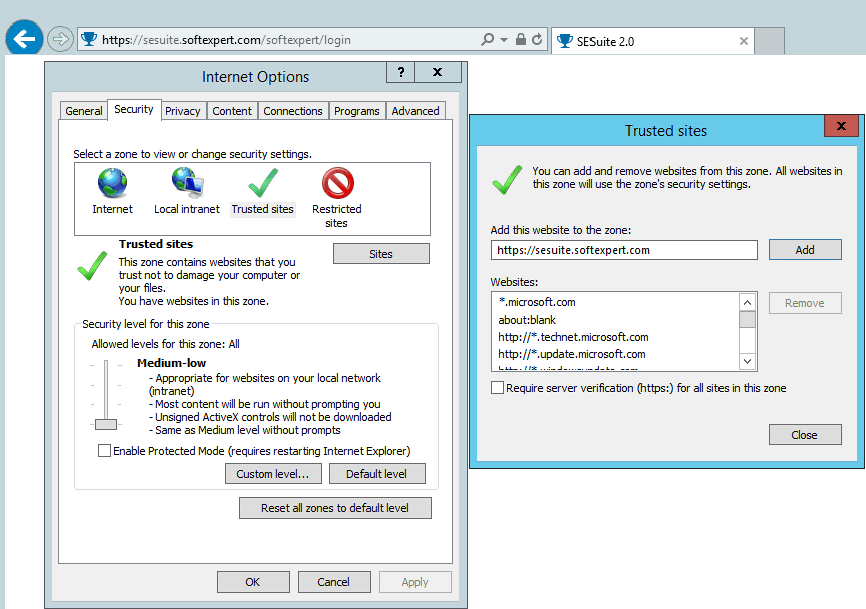
Open Internet Explorer and access the SoftExpert Suite login screen.
-
Go to "Tools > Internet Options".
-
In the "Security" tab, select "Trusted sites".
-
Set "Security level for this zone" to "Medium-low".
-
Click on "Sites".
-
In Add this website to the zone, click on Add.
-
Click on Close and on OK to finish.
Compatibility Mode
From version 2.0 onwards, the compatibility mode must be disabled for the system access URL. If you were using SoftExpert Suite in a previous version, follow the steps below to disable it:
Automatic Mode (GPO)
-
Open "Group Policy Management", then go to "User Configuration > Administrative Templates > Windows Components > Internet Explorer > Compatibility View".
-
Double-click on "Use Policy List of Internet Explorer 7 sites" and click on "Show".
-
Check if the system access URL is on the list. If it is, remove the row.
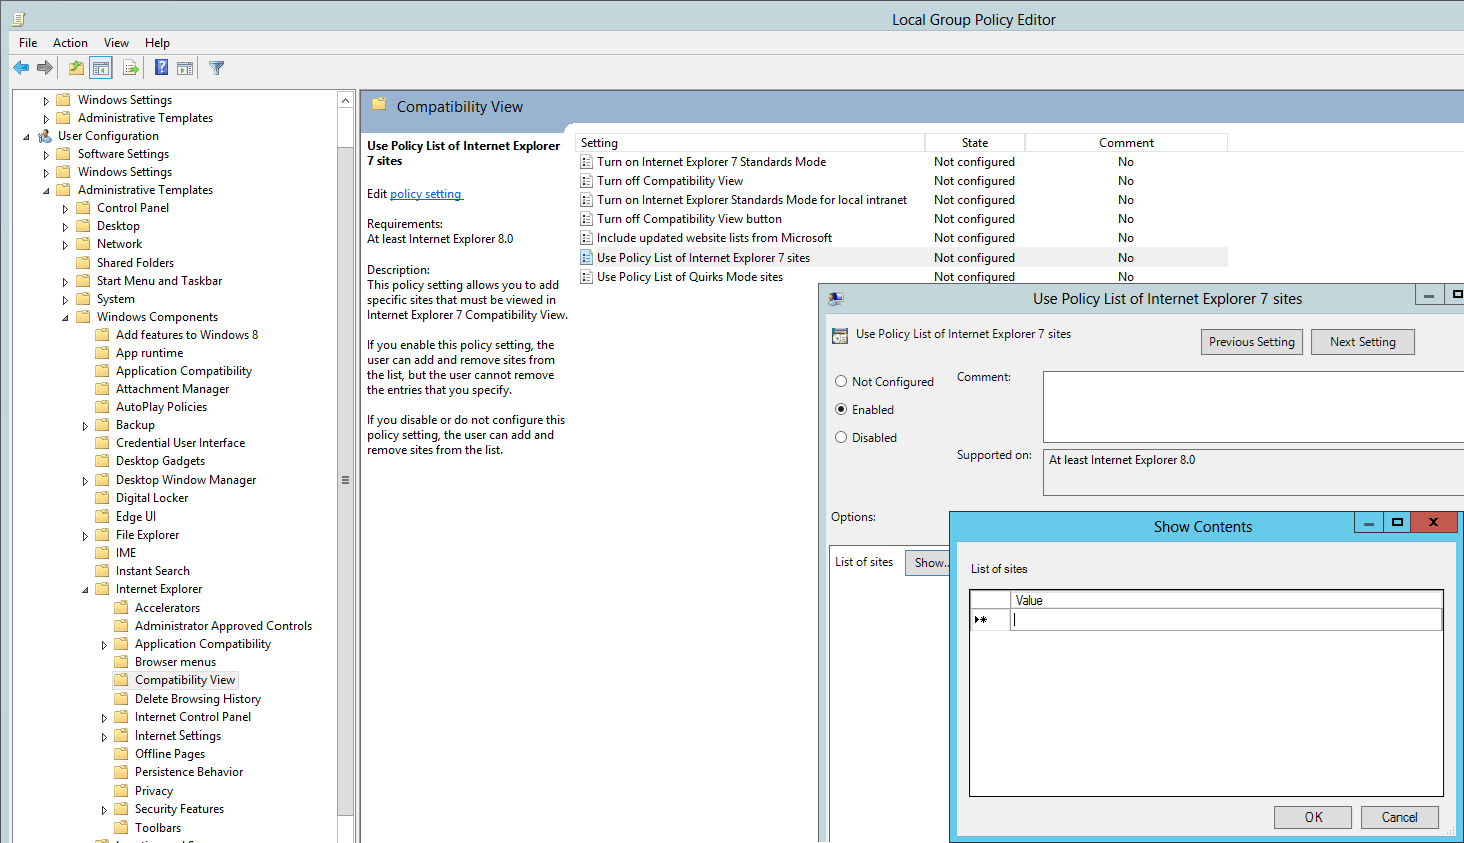
- Click on "OK" to finish.
If this item is not enabled, skip this step.
Manual Mode
-
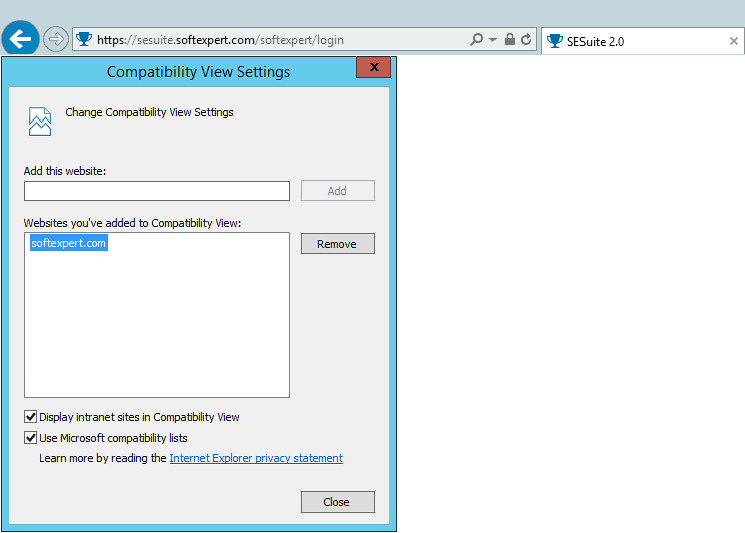
Open Internet Explorer and go to "Tools > Compatibility View settings".
-
In "Websites you're added to Compatibility View", locate the system access URL and click on "Remove".
-
Click on "Close" to finish.
Java security
Java connects to certificate authorities to confirm the validity of HTTPS certificates. When the station does not have Internet access, the execution of Java programs may slow down. As a workaround, follow one of the instructions below:
- In the proxy, allow stations to access the following URLs:
http://crl.comodoca.com/COMODORSADomainValidationSecureServerCA.crl
http://crt.comodoca.com/COMODORSADomainValidationSecureServerCA.crt
- If you cannot release the proxy, set up Java not to attempt to verify the certificate. See below how to perform this operation.
Automatic Mode (GPO)
- Create a ".bat" file containing the commands below:
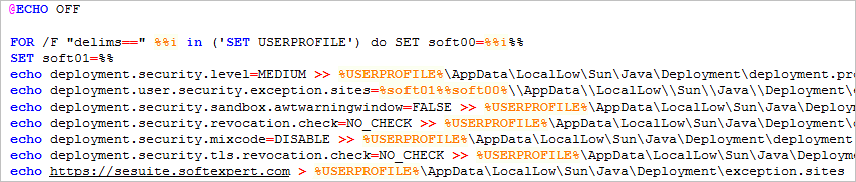
@ECHO OFF

FOR /F "delims==" %%i in ('SET USERPROFILE') do SET soft00=%%i%%

SET soft01=%%

echo deployment.security.level=MEDIUM >> %USERPROFILE%\\AppData\\LocalLow\\Sun\\Java\\Deployment\\deployment.properties

echo deployment.user.security.exception.sites=%soft01%%soft00%\\\\AppData\\\\LocalLow\\\\Sun\\\\Java\\\\Deployment\\exception.sites >> %USERPROFILE%\\AppData\\LocalLow\\Sun\\Java\\Deployment\\deployment.properties

echo deployment.security.sandbox.awtwarningwindow=FALSE >> %USERPROFILE%\\AppData\\LocalLow\\Sun\\Java\\Deployment\\deployment.properties

echo deployment.security.revocation.check=NO\_CHECK >> %USERPROFILE%\\AppData\\LocalLow\\Sun\\Java\\Deployment\\deployment.properties

echo deployment.security.mixcode=DISABLE >> %USERPROFILE%\\AppData\\LocalLow\\Sun\\Java\\Deployment\\deployment.properties

echo deployment.security.tls.revocation.check=NO\_CHECK >> %USERPROFILE%\\AppData\\LocalLow\\Sun\\Java\\Deployment\\deployment.properties

echo https://sesuite.softexpert.com > %USERPROFILE%\\AppData\\LocalLow\\Sun\\Java\\Deployment\\exception.sites
Note: Replace sesuite.softexpert.com with the SoftExpert Suite access URL.
-
Open "Group Policy Management", then go to "User Configuration > Windows Settings > Scripts (Login/Logoff)".
-
Double-click on "Logon" and click on "Add".
-
Click on Browse and then select the .bat file created previously:

- Click on "OK" to finish.
Manual Mode
-
Go to "Start Menu > Run".
-
Type "javaws-viewer" and click on "OK".
-
In the "Security" tab, select "High".
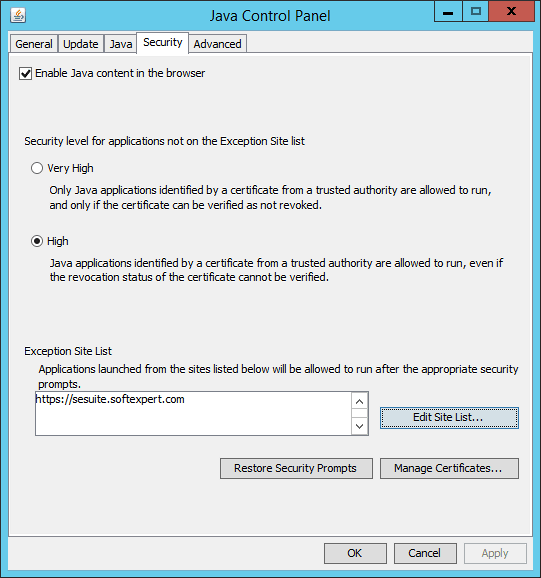
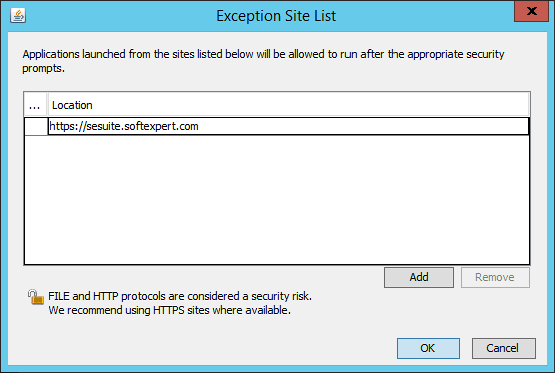
- Click on "Edit Site List" and add the SoftExpert Suite access URL:
-
Click on "OK".
-
Access the "Advanced" tab and check these options:
▪ Mixed code (sandbox vs. Trusted) security verification > Disable verification
▪ Perform signed code certificate revogation checks on > Do not check
▪ Perform TLS certificate revogation checks on > Do not check
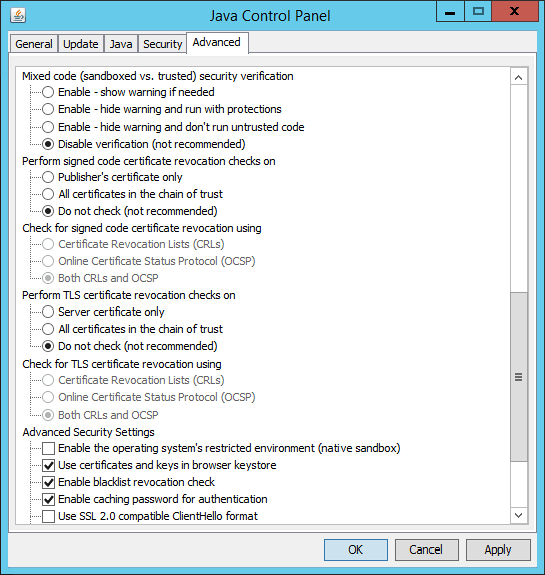
- Click on "OK" to finish.
Security recommendations
To prevent the proxy and antivirus from blocking parts of the system or slowing down access, we request that the system access URL be configured as an exception in the proxy (bypass), and that the ".jar" files be configured as an exception in the antivirus.
Automatic cleaning routines of the user's temp can also slow down access the first time.
OpenOffice automation
OpenOffice automation allows you to disable saving, printing, and other functions. In order for OpenOffice automation to be used, the client machine must have access to the following directories (on the client machine itself):
C:\Windows\Temp
C:\Program Files\Java\jre8\lib\ext
MSI installation
PDF, DWG and DXF files in SoftExpert Suite are displayed through SoftExpert Viewer. When opening one of these files for the first time, the system prompts you to install the viewer. If the user logged in to the machine does not have permissions to install the viewer, the administrator will need to perform the procedure below:
Locate the sepreview.zip file, in the SoftExpert Suite installation directory (server): "C:\Inetpub\SE\web\wwwroot\generic\app\viewer\sepreview.zip".
Manual procedure
Unzip the sepreview.zip file and execute the MSI file on the client stations that need the viewer to be installed.
The installation must be carried out by a user with administrator permission on the machine.
Automatic procedure
Unzip the sepreview.zip file and add the MSI file to the network logon script so that it is replicated to all stations automatically.
It must be parameterized to run with administrator permission whenever a new user logs onto the machine.
URIRegister
For SoftExpert Suite to function as best as possible, SoftExpert developed some applications that run on the customer's station in order to enable greater productivity in operations such as editing and viewing documents. As examples of applications, we have: DocView, used for editing and viewing Microsoft Word documents, and PDFViewer, used for viewing PDF files.
Because SoftExpert Suite is a WEB application, there must be some configurations on the users' machines for a successful connection between the browser and the executable. In order to simplify these configurations, SoftExpert developed the URIRegister.exe application, which aims to carry out all the necessary configurations on the customer's station, allowing the SoftExpert Suite to call SoftExpert executables (DocView, PDFViewer, or ExcelView). This executable allows calling only applications developed by SoftExpert.
The URIRegister.exe application was developed using the "URI" standard, and its purpose is to include the SoftExpert applications in the Windows registry, so that SoftExpert Suite can run these applications.
To dispense with the need to run URIRegister.exe, the system administrator can manually create the records described below:
Manual configuration to eliminate the need for URIRegister
The following records must be inserted into the machine's regedit, as follows:
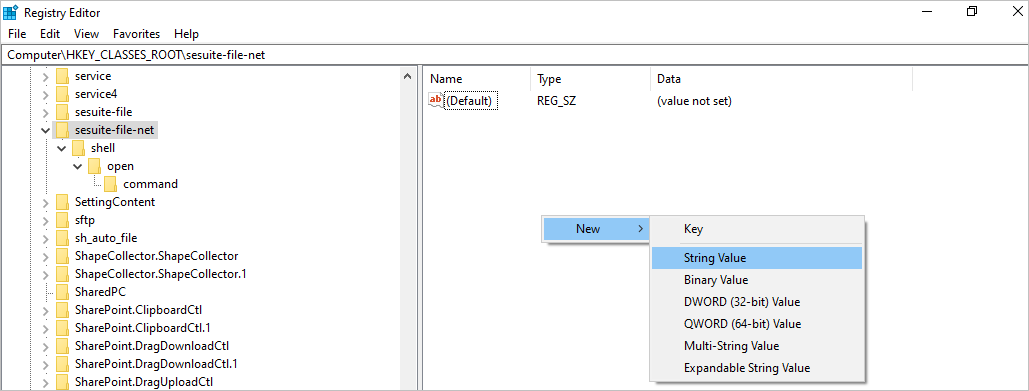
1. Create the sesuite-file-net key inside Computer\HKEY_CLASSES_ROOT\;
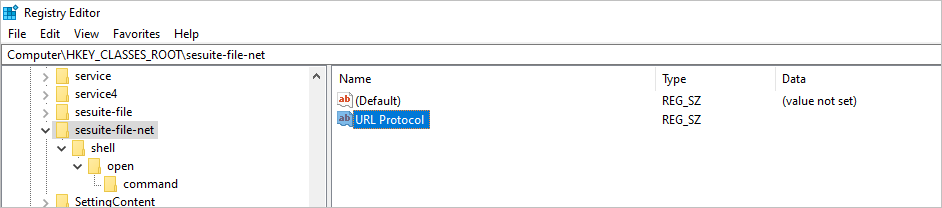
2. In the created key, create a new String value named "URL Protocol" without value:
The key will be displayed as follows:
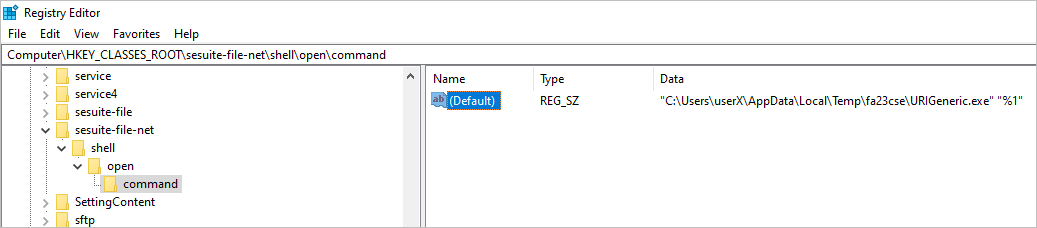
3. Below the sesuite-file-net key, create the shell\open\command keys, as shown in the previous image. In the last one, change the (default) value to the executable path:
"<USER\_TEMP\_PATH> \\fa23cse\\URIGeneric.exe" "%1"
For the system to understand that the records are already configured manually and not show unnecessary messages to the user, the command below must be run in the database:
insert into adparams(cdparam, cdisosystem, idparam) values(164, 21, '1')
After running the command, access the SoftExpert Document component, go to Configuration > General parameters and save. This way, the parameter configured in the database will be loaded into the system cache.