Troubleshooting
The topics in this section contain the steps for solving problems identified in SoftExpert Suite.
Requirements check
Since version 2.0.5, SoftExpert Suite has a requirements checker. This resource is a feature that is executed during the SoftExpert Suite startup and aims to ensure that the server meets all the system usage requirements. If a requirement does not meet the system usage, the checker will display a message to indicate the configuration that needs to be resolved.
See below some settings that may be requested for starting the SoftExpert Suite service:
Setting the time zone in Java
By default, the time zone used in Java is the same as that configured in the operating system. In order for the application to be started with a time zone different from that used in the operating system, this information must be passed on to Java at system startup using the user.timezone attribute, as shown in the examples:
SoftExpert Suite with Windows
▪ Run the "Tomcat monitor" application (TOMCAT_HOME\bin\tomcat7w.exe)
▪ Access the Java tab.
▪ Add a new line in the "Java options" field with the value: -Duser.timezone=America/Sao_Paulo.
The time zone used in the example is the official Brazilian time zone; the identifier for other time zones can be found at: https://en.wikipedia.org/wiki/List_of_tz_database_time_zones(Accessed on Sep/08/2016).
Adjusting daylight saving time
If the system displays a message of divergence regarding the daylight saving time configuration between Java and PHP, the problem may be in the version of the Java time zone database. To update the database, follow these steps:
▪ If Java JRE is being used, download the "Timezone Updater Tool" application, available on the Oracle website; if Java OpenJDK is being used, download the "ZIUpdater Time Zone Tool" application, available on the Azul Systems website.
▪ Run the application with the same Java virtual machine used by SoftExpert Suite with the "java -jar tzupdater.jar -f" command line. For Java OpenJDK, run the "java -jar ziupdater-1.0.1.2.jar -f" command.
If the current directory is not the same as the one where tzupdater.jar is located, use the full path to the tzupdater.jar file.
- For JVM Oracle, use the command below to update the service:
"%JAVA_HOME%/bin/java.exe" -jar tzupdater.jar -v -f -l file:////tzdata2014a.tar.gz
For example:
"C:\Program Files\Java\jre1.8.0_101\bin\java.exe" -jar tzupdater.jar -v -f -l file:///Users/Administrator/Desktop/sesuitetz-windows/tzdata-latest.tar.gz
- For JVM OpenJDK, use the command below to update the service:
"%JAVA_HOME%/bin/java.exe" -jar ziupdater.jar -v -f -l file:////tzdata2014a.tar.gz
For example:
"C:\Program Files\Java\jre1.8.0_101\bin\java.exe" -jar ziupdater.jar -v -f -l file:///Users/Administrator/Desktop/sesuitetz-windows/tzdata-latest.tar.gz
▪ To compare the versions of the Java and application time zone databases, run the "java -jar tzupdater.jar -V" command.
Setting the time zone in PHP
To define the time zone that will be used by PHP, edit the php.ini file (usually located at SESUITE_HOME\web\phpBaseclass\php.ini). Find and edit the following line, in accordance with your time zone:
date.timezone = America/Sao\_Paulo
The time zone used in the example is the official Brazilian time zone; the identifier for other time zones can be found at: https://en.wikipedia.org/wiki/List_of_tz_database_time_zones.
Troubleshooting Java problems
| System | Parameter | Description |
|---|---|---|
| GENERAL | HD | "HD has free space of AVAILABLE DISK SPACE, when it should be at least 5GB." |
| Solution |
|---|
| Free up physical space on the machine. |
| System | Parameter | Description |
|---|---|---|
| GENERAL | JavaVersion | "The installed Java version is JAVA VERSION, when it should be 1.8." |
| Solution |
|---|
| Remove the Java version and install the correct version. |
| System | Parameter | Description |
|---|---|---|
| GENERAL | TomcatMemory | "The Apache Tomcat server is configured to use up to CONFIGURED_MEMORY MB of memory. At least 1024 MB of memory is required. Check in the system installation guide how to set this configuration." |
| Solution |
|---|
| For Windows environments, see the memory configuration procedure described in the Apache Tomcat installation section. |
Troubleshooting php.ini problems
| System | Parameter | Description |
|---|---|---|
| GENERAL | output_buffering | "output_buffering variable with VALUE value, when it should be 1. Check configuration in php.ini." |
| GENERAL | max_input_time | "max_input_time variable with VALUE value, when it should be at least 300. Check configuration in php.ini." |
| GENERAL | memory_limit | "memory_limit variable with VALUE value, when it should be -1. Check configuration in php.ini." |
| GENERAL | post_max_size | "post_max_size variable with VALUE value, when it should be at least 500M. Check configuration in php.ini." |
| GENERAL | upload_max_filesize | "upload_max_filesize variable with VALUE value, when it should be at least 500M. Check configuration in php.ini." |
| GENERAL | session.name | "session.name variable with value VALUE value, when it should be se-authentication-token. Check configuration in php.ini." |
| GENERAL | session.gc_probability | "session.gc_probability variable with VALUE value, when it should be 0. Check configuration in php.ini." |
| GENERAL | session.gc_maxlifetime | "session.gc_maxlifetime variable with VALUE value, when it should be 86400. Check configuration in php.ini." |
| GENERAL | session.cache_expire | "session.cache_expire variable with VALUE value, when it should be 86400. Check configuration in php.ini." |
| GENERAL | opcache.enable | "opcache.enable variable with VALUE value, when it should be 1. Check configuration in php.ini." |
| GENERAL | opcache.memory_consumption | "opcache.memory_consumption variable with VALUE value, when it should be 256. Check configuration in php.ini." |
| GENERAL | opcache.interned_strings_buffer | "opcache.interned_strings_buffer variable with VALUE value, when it should be 128. Check configuration in php.ini." |
| GENERAL | opcache.max_accelerated_files | "opcache.max_accelerated_files variable with VALUE value, when it should be 70000. Check configuration in php.ini." |
| GENERAL | opcache.save_comments | "opcache.save_comments variable with VALUE value, when it should be 1. Check configuration in php.ini." |
| GENERAL | opcache.load_comments | "opcache.load_comments variable with VALUE value, when it should be 1. Check configuration in php.ini." |
| GENERAL | opcache.enable_cli | "opcache.enable_cli variable with VALUE value, when it should be 0. Check configuration in php.ini." |
| GENERAL | max_execution_time | "max_execution_time variable with VALUE value, when it should be at least 200. Check configuration in php.ini." |
| GENERAL | session.save_path | "session.save_path variable was not set. Check configuration in php.ini." |
| GENERAL | date.timezone | "date.timezone Java variable (JAVA_TIME_ZONE) must be the same as PHP (PHP_TIME_ZONE). Java uses the time zone defined by the operating system, while PHP uses the value defined in the php.ini file." |
| Solution: |
|---|
|1. Open the SUITE_HOME\web\php\php.ini file and search for the message variable. |2. Check if there are other equal (repeated) variables.| |3. If there is more than one equal variable, add ";" (semicolon) at the beginning of the line, so that it is commented out; this way, the variable will not be validated. Example of a commented variable: ;cgi.force_redirect = 1 | Example of a valid variable (uncommented): cgi.force_redirect = 1| |4. After finding the variable, set the correct value, as described in the message.| |5. Save the file and restart SoftExpert Suite.|
| WINDOWS | realpath_cache_size | "realpath_cache_size variable with VALUE value, when it should be at least 1024k. Check configuration in php.ini." |
|---|---|---|
| WINDOWS | cgi.force_redirect | "cgi.force_redirect variable with VALUE value, when it should be 0. Check configuration in php.ini." |
| WINDOWS | fastcgi.impersonate | "fastcgi.impersonate variable with VALUE value, when it should be 1. Check configuration in php.ini." |
| Solution: | | -------------------------------------------------------------------------------------------------------------------------------------------------------------------------------------------------------------------------------------- | --- | | 1. Open the SUITE_HOME\web\php\php.ini file and search for the message variable. | | 2. Check if there are other equal (repeated) variables. | | 3. If there is more than one equal variable, add ";" (semicolon) at the beginning of the line, so that it is commented out; this way, the variable will not be validated. Example of a commented variable: ;cgi.force_redirect = 1 | | Example of a valid variable (uncommented): cgi.force_redirect = 1 | | 4. After finding the variable, set the correct value, as described in the message. | | 5. Save the file and restart SoftExpert Suite. | |
| System | Parameter | Description |
|---|---|---|
| WINDOWS | Zend OPcache | "The zend_extension=ZendLoader.dll extension is not enabled. Check configuration in php.ini." |
| WINDOWS | memcache | "The extension=php_memcache.dll extension is not enabled. Check configuration in php.ini." |
| WINDOWS | zip | "The extension=zip.dll extension is not enabled. Check configuration in php.ini." |
| WINDOWS | soap | "The extension=soap.dll extension is not enabled. Check configuration in php.ini." |
| WINDOWS | gd | "The extension=gd.dll extension is not enabled. Check configuration in php.ini." |
| Solution: | | ------------------------------------------------------------------------------------------------------------------------------------------------------------------------------------------------------------------------------------------------- | --- | | 1. Open the SUITE_HOME\web\php\php.ini file and search for the extension described in the message. | | 2. Check if there are other equal (repeated) extensions. | | 3. If there is more than one equal extension, add ";" (semicolon) at the beginning of the line, so that it is commented out; this way, the extension will not be validated. Example of a commented extension: ;zend_extension=php_opcache.dll | | Example of a valid extension (uncommented): zend_extension=php_opcache.dll | | 4. After finding the extension, set the correct value, as described in the message. | | 5. Save the file and restart SoftExpert Suite. | |
Troubleshooting template problems
| System | Parameter | Description |
|---|---|---|
| GENERAL | ...web\include\template | The FILE_NAME template is not a template in JSON format. |
| Solution: |
|---|
| Contact SoftExpert. |
Troubleshooting application server problems
| System | Parameter | Description |
|---|---|---|
| GENERAL | GET/POST/PUT/DELETE | The application server is configured to block HTTP requests with the METHOD method. |
| Solution: |
|---|
| Release requests to the application server with the required method. Usually, the IIS WebDav module blocks some methods by default. |
Troubleshooting NODE problems
Database port configuration
During CHECKSYSTEM (process that validates the system at startup), the export service is validated. One of the most common problems that occurs with this service is having a specific port defined that is not accessible by the service. Therefore, we recommend updating the database directly, thus defining an automatic port (value 0) or a specific one to resolve this situation.
Change through the database:
UPDATE bi2config SET nrportexport = 0 --Port number
WHERE oid = 1;
Node.js checkpoints
• Make sure that the installed node version is 8.9.1.
• All libraries must be installed during the installation process.
• The TEMP path needs all the correct permissions.
• The server must meet memory requirements; otherwise, slow exports or failures may be generated.
• Make sure the server has the fonts used in the system installed; the server must have at least the Arial font available.
• If there is an antivirus service installed on the server, make sure to add SoftExpert Suite to a list of Internet scanning exceptions using the website blocking feature.
Indexing server
The objective of the indexing server is to extract data from SoftExpert Suite records and files for indexing. Indexes are used in some system queries, in addition to the general query. This service works in parallel with the system; when SoftExpert Suite starts up, the indexing service starts up as well.
The indexing server is made up of two important services for its correct functioning, namely:
Atlas
Atlas is the name of the internal engine developed by SoftExpert that encapsulates the Elasticsearch engine and provides services to ensure better communication with SoftExpert Suite. This service is used in general and component queries.
Elasticsearch
Elasticsearch is a powerful search and indexing tool for textual searches (Full-Text Search). One of its main qualities is its high performance in the search, in addition to being adaptable to systems with Load Balance. For more information, see the engine website.
Here are the steps to check whether the service is running:
How do I know if Atlas and Elasticsearch have started?
When an environment with Elasticsearch support is deployed, if the engine has been successfully deployed, it must create the atlas.pid and elasticsearch.pid files (or overwrite them, if any) in the ‘SESUITE_HOME\system\tools\indexer’ directory.
Atlas/Elasticsearch is not live. What should I do?
If you have deployed SoftExpert Suite and, even so, the Elasticsearch or Atlas service has not run along with it, first check if the configurations of both the environment and the SEFTSSETTINGS table are in accordance with what is expected. If the configuration is correct, or if the system administrator has doubts about these settings, SoftExpert's support team must be contacted to analyze the situation.
In some cases, this service may not work properly. Here is a list of possible causes and their solutions:
Port blocked on the FIREWALL
1. To check the port that is being used by the Atlas and Elasticsearch services, run the following query:
#Port used by the Atlas service

SELECT NRENGINEESPORT FROM SEFTSSETTINGS

#Port used by the Elasticsearch

SELECT NRESPORT FROM SEFTSSETTINGS
2. Check if there is any firewall configuration on the server blocking the port of the NRENGINEESPORT parameter, or of the NRESPORT parameter. After unlocking the ports, you will need to restart the system and check if the indexing service is running.
Port being used in another service
1. Run the command below to check which port is being used.
Example:
#Ports used by the index server (Atlas/Elasticsearch)

SELECT NRESPORT, NRENGINEESPORT FROM SEFTSSETTINGS
2. Check if there is any other service that is using the port of the NRENGINEESPORT and NRESPORT parameters. If there is, change to an available port.
IMPORTANT!
Never run commands to change ports or other parameters in the SEFTSSETTINGS table without a prior analysis of the impact and without, first, consulting with SoftExpert's support team.
System version
The system checks package versioning in order to keep SoftExpert Suite stable. Incompatibilities between the versions of installed/updated packages may be found. See below the solution to stabilize SoftExpert Suite:
-
First, stop all services used by SoftExpert Suite.
-
Run SoftExpert Configurator, which can be found at SESUITE_HOME\tools\configurator. On the screen that opens, click on the button for equalizing the database:
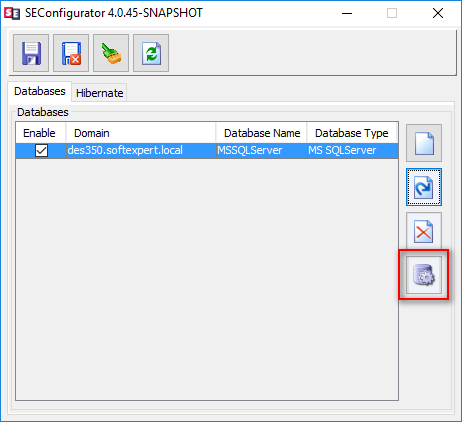
- After equalizing, restart the system.
Single Sign-On
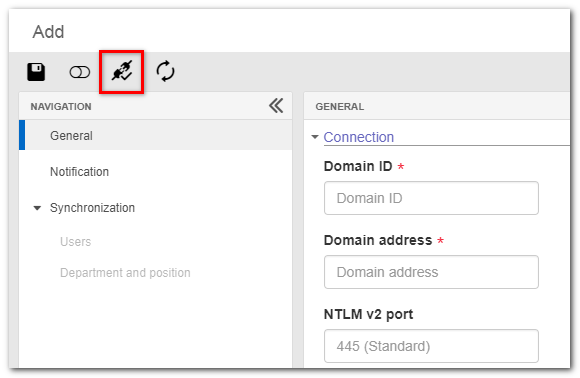
To anticipate possible problems in the process of synchronizing and
authenticating users in a domain, it is possible to test the domain
configuration in the system authentication configuration (CM008), "Directory
integration ![]() Domains" section, when
creating or editing a record . This procedure will test communication between
the SoftExpert Suite server and the authentication and directory servers
specified in the configuration. The protocol tested is LDAP, using the
connection string and provided username and password.
Domains" section, when
creating or editing a record . This procedure will test communication between
the SoftExpert Suite server and the authentication and directory servers
specified in the configuration. The protocol tested is LDAP, using the
connection string and provided username and password.
Usually, failure during the connection test occurs if there are errors in the domain configuration or issues in the network connections between the SoftExpert Suite server and the servers that host the directory and authentication services. Therefore, we recommend using tools for connection diagnostics, or asking the network administrator for assistance to check addresses and ports used in communication.
Possible returns from the connection test:
▪ Message on error when connecting to the domain controller: The SoftExpert Suite server was unable to establish a connection via the LDAP protocol using the URL entered in the "Connection String" field. Check that the field is filled in correctly; if a port was not specified in the URL itself, check that the server is accepting connections on the default LDAP port 389, or on ports 636 and/or 3269, the default ones for LDAPS, or contact the directory service administrator to check service availability.
▪ Error message stating that the user was not found or the password is incorrect: Communication with the directory service occurred without problems, but the user and password entered in the "User" and/or "Password" fields are incorrect. This user refers to a user registered in the directory service; therefore, check whether the name and password match the information recorded in the service. Remember that, in the "User" field, the user's name must be entered, not the login.
Outlook configuration
If there is a problem sending attachments, that is, a recipient is not receiving e-mail attachments, this is possibly due to a Microsoft Outlook setting. This section will present some settings that can be defined in Outlook to solve this problem.
Problem cause
This is a common problem that occurs because of Outlook, when a message is sent in RTF (Rich Text Format) format and is not converted correctly into HTML or Plain Text.
Solutions
Submission using HTML or Plain Text format
One possible issue is that you are sending the attachment in RTF format and the message is not being converted correctly to HTML or plain text. In this case, follow the steps below to solve the problem.
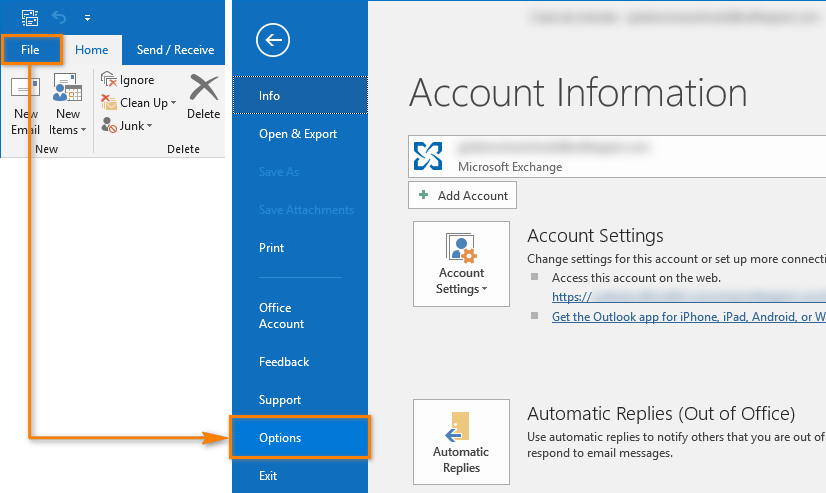
- In Outlook, access the File > Options menu:
- On the Outlook options screen, select the Mail menu. Then, in the Compose messages section, select the "HTML" or "Plain Text" option in the Compose messages in this format: field.
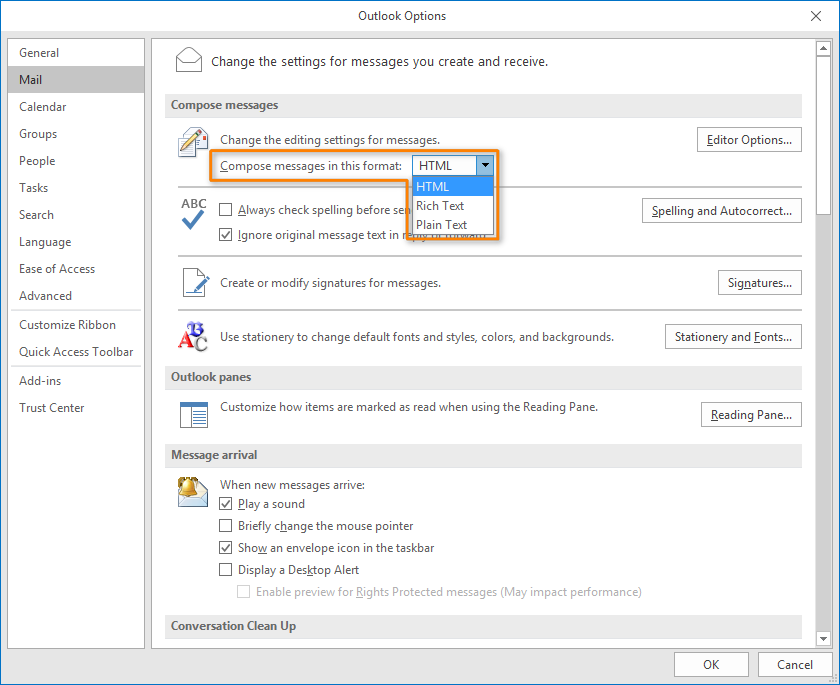
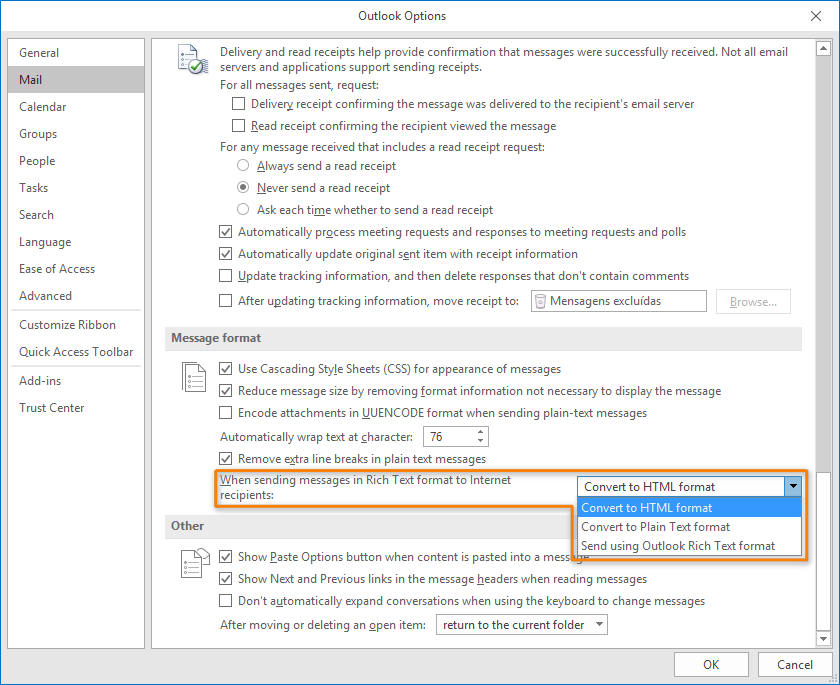
- Still in the Mail menu of the Outlook options screen, locate the Message format section. Then, make sure the When sending messages in Rich Text format to Internet recipients field is configured with the "Convert to HTML format" option or with the "Convert to Plain Text format" option.
- Click on OK to save the changes.
Replying to an e-mail
If you need to reply to a received e-mail, in order to prevent the problem of the attachment disappearing with the reply, change the message format to HTML. To do this, first, open the e-mail on reply mode. Then, set the following configurations, which depend on your Outlook version:
If your Outlook version is 2003
i. Select the Formatting tab.
ii. Select the HTML option.
If your Outlook version is 2007
i. Select the Options tab.
ii. Select the HTML option.
If your Outlook version is 2010, 2013 or 2016
i. Select the Format text tab.
ii. Select the HTML option.
