Creating a data source
Data source data
To add a new data source, click on the button ![]() from the
main screen toolbar. To edit a data source, select it from the list of records
and click on the
from the
main screen toolbar. To edit a data source, select it from the list of records
and click on the ![]() button.
button.
On the screen that will open, enter an ID # and name for the data source:
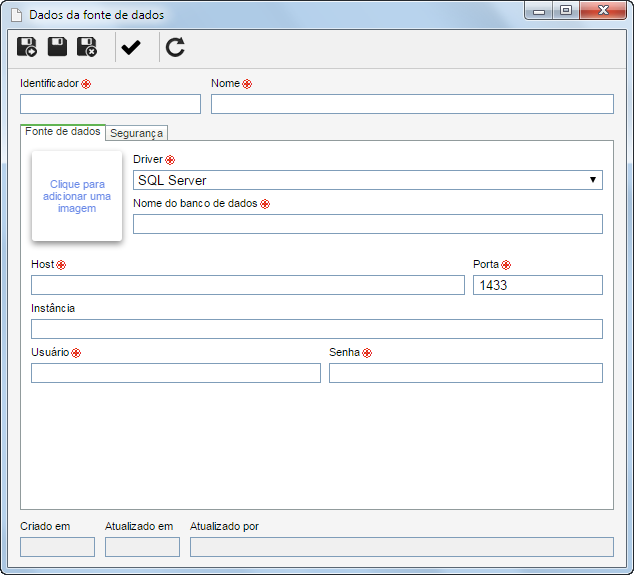
Data source
| Field | Description |
|---|---|
| Click to add an image | Click on this square to add an image that will represent the data source. |
| Driver | Select the driver corresponding to the database that will be used. Depending on the option selected in this field, the availability and name of the other fields may vary. |
| Database name | Enter the name of the database that will be used (SQL Server, PostgreSQL, Oracle, or MySQL). |
| Host | Enter the database server host. |
| Port | Displays the default port of the previously selected driver; it can be changed. In this case, enter the driver port. |
| Instance | This field will only be available when the selected driver is SQL Server. If the database server has instances, specify which one will be used. Note: Do not fill in this field for connections to databases in Azure. |
| User | Enter the user that will be used to authenticate the database. |
| Password | Enter the password that will be used to authenticate the database. |
After filling in the fields on this tab, click on the
![]() button from the toolbar on the data source
data screen to validate them.
button from the toolbar on the data source
data screen to validate them.
For connections to MySQL Server, SoftExpert Suite uses MySQL Connector/J 8.0; its official documentation recommends using MySQL Server 5.7 and 8.0.
Refer to the "System requirements" technical document for more details about the DBMS versions that are compatible with the SoftExpert Suite data source.
Security
In this tab, you can define a security list for the data source. Enable the desired option:
1. Private
Only users specified in this tab will be able to edit or view the data source. To do this, use the following columns:
- Edit: Add the users, teams, departments and/or positions that will have permission to edit the data source.
- View: Add the users, teams, departments and/or positions that will have permission to view the data source.
2. Public
All system users will be able to view the data source; however, only those specified in the respective column will be able to edit it. For this reason, the
View column will be disabled (since the data source can be viewed by any user). In the Edit column, add the users, teams, departments and/or positions that will have permission to change the data source data.
To add a user/team/department/position to the security list, simply type the
desired name in the available field and select the corresponding option from the
list that will be presented, or press the "Enter" key. To delete a
user/team/department/position from the security list, click on the
![]() button located next to the desired
record.
button located next to the desired
record.
When all necessary configurations have been set, save the record.