Post-installation activities
This section describes the following post-installation activities:
Activation
After installing SoftExpert Suite, some configuration activities will be required in order for SoftExpert Suite to be ready for use, such as system configuration, access license, system activation, and email settings. Some of these activities are described in the SoftExpert Configuration documentation. See below how to perform these activities:
1. When SoftExpert Suite is accessed for the first time, a screen will be displayed;
use it to configure at least the name of the organization that purchased the system, and the admin user's access password. See the SoftExpert Configuration documentation, "Configuration > System" section, for more details on how to set the general system configurations.
2. With the admin user configured, enter the activation key. Refer to the
SoftExpert Configuration documentation, "Configuration > License key" section, for more details on how to configure the license key.
After any change to the license key, either when updating it or adding a new one, SoftExpert Suite will have to be activated.
If, in the SoftExpert Configuration component ("Configuration -> System" menu), the "Enable automatic activation" option is selected, the activation procedure described below does not need to be performed.
SoftExpert Suite manual activation
1. If automatic activation is not enabled, whenever
a change is made to system configurations, SoftExpert Suite will have to be activated manually. When that happens, the following screen will be displayed upon access to the system:
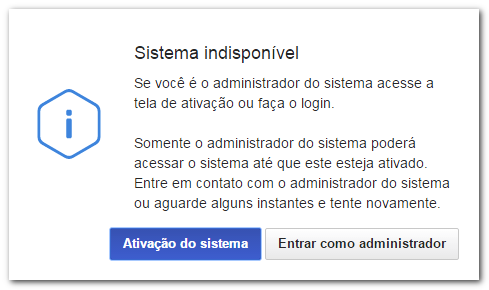
2. To activate the system, click on the System activation button.
The system will display a screen with a brief description of the changes made:
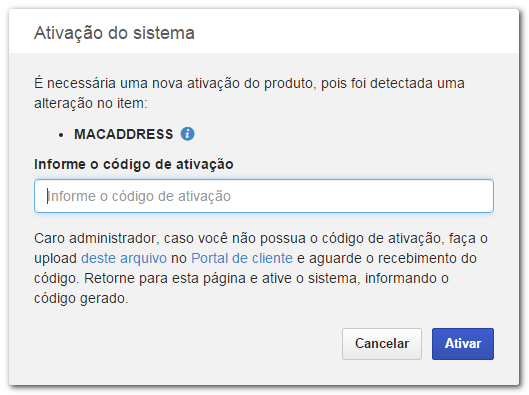
3. Carefully follow the instructions on the system activation screen. Download the
activation.hbl file and access the Customer Center. Enter your login and password; you will be redirected to the activation page.
Note that the Customer Center will open in a new tab of your browser. The SoftExpert Suite page tab must not be closed because, after generating the activation code, you will have to return to that tab.
4. On the activation page of the Customer center, upload the file.
After selecting the activation.hbl file in the respective field, click on the UPLOAD button.
5. At this point, the system will display the screen with the activation code. Copy the
generated code, go back to the SoftExpert Suite screen, and enter the activation code.
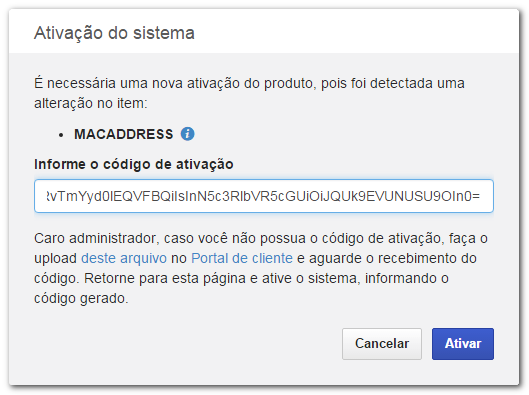
6. After that, click on the Activate button. The SoftExpert Suite page will
reload and, from this point on, any registered user will be able to access the system.
Configuring the e-mail server
See the SoftExpert Configuration documentation, "Configuration > E-mail server" section, for more details on how to configure the e-mail servers that can be used to send system notifications (via e-mail).
Enabling e-mail submission
In order for e-mail notifications to be sent, the "Enable sending system e-mails" option must be checked in the "Configuration > E-mail notification (CM022)" menu of the SoftExpert Configuration component. See the SoftExpert Configuration documentation, "Configuration > E-mail notification" section, for more details on how to configure the e-mails that can be sent by the system. It is worth remembering that the e-mail submission feature requires that the e-mail server be properly configured.