Configuration for direct directory service access
Here's how to configure and execute the user synchronization process using direct communication mode:
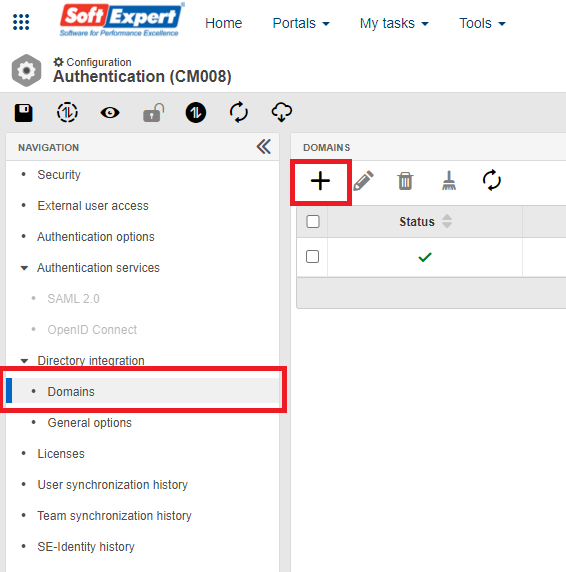
- To add a new domain configuration, follow the steps below:
- Access the Configuration component > Authentication (CM008) in SoftExpert Suite.
- On the screen that will open, go to the Directory Integration > Domains section and click on the Add button.
- In the General > Connection section of the screen that will open, configure the data for connection to the LDAP server. Make sure you correctly fill in the following fields:
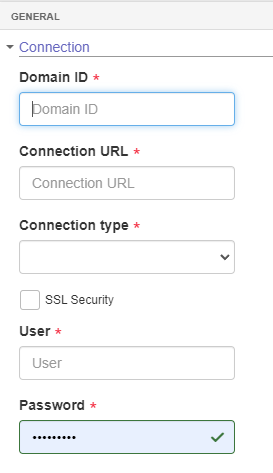
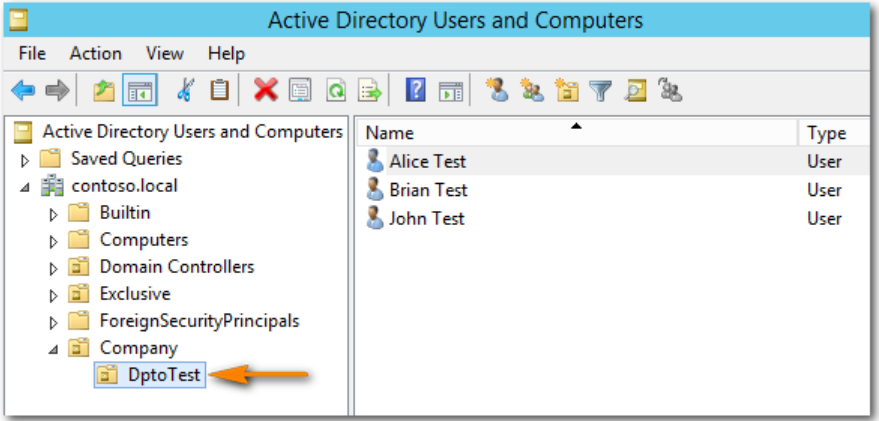
- Domain ID: Enter the domain ID for connection to the LDAP server. You can
find the domain ID in computer properties, accessed through the Control Panel.
- The following image illustrates where to find the domain ID (A) and address
(B) in computer properties:
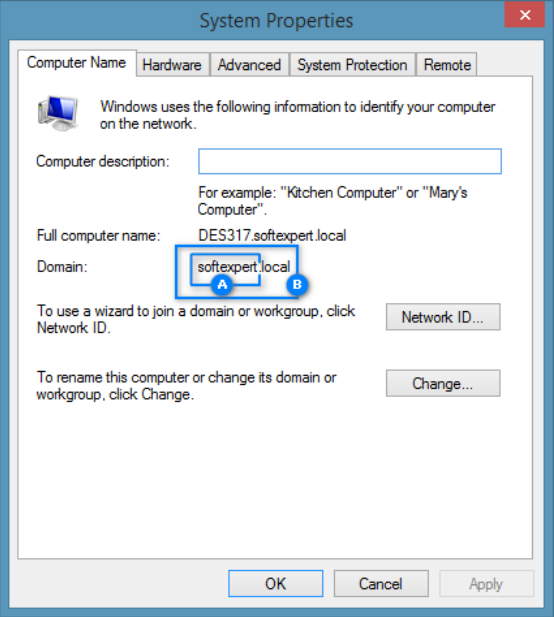
- The following image illustrates where to find the domain ID (A) and address
(B) in computer properties:
- Connection string: Enter the string for connection to the LDAP
server.
ldap://<hostname>:<port>; remember that the default value for the Microsoft Active Directory connection port is 389. For example:
ldap://contoso.local:389
- Connection type: Select which LDAP directory service will be used:
- Active Directory: Active Directory is a directory service implementation in the LDAP protocol that stores information about objects on a computer network. It makes this information available to network users and administrators. Active Directory is a Microsoft software widely used in Windows environments.
- OpenLDAP: OpenLDAP is a free and open source software that implements the LDAP protocol. It is a directory service based on the X.500 standard. OpenLDAP is operating system independent and is available on various Linux distributions, as well as on operating systems such as BSD, AIX, HP-UX, Mac OS X, Solaris, Microsoft Windows (2000, XP, 2003, 2008, Vista, Windows 7, and Windows 8) and z/OS.
- SSL Security: Check this option to use the SSL security protocol when accessing the system. SSL (Secure Sockets Layer) provides privacy and data integrity between two applications communicating over the Internet. It authenticates the parties involved and encrypts transmitted data, ensuring that unauthorized intermediaries cannot access or falsify data.
- User: Enter the username for connection to the LDAP server. For example, "Synchronization User". This username will be used to establish the connection to the directory service during the synchronization and simulation processes.
- Password: Enter the password for user authentication when establishing the connection to the LDAP server.
⚠️ Attention:
- It is recommended that a specific user be created for this connection in the directory service, with the appropriate permission to carry out searches using the filter and directory specified in the following steps.
- In the "Search criteria (user/group/team)" section, enter the criteria to search for specific information in the LDAP server. To do this, fill in the Filter field (to narrow down the search result) and the Directory field (from where the data will be imported).
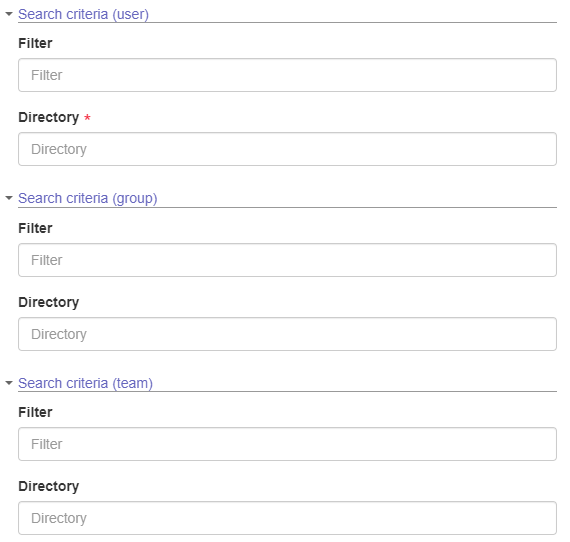
- To view the directory/user structure contained in the directory service, we recommend using external tools, such as Active Directory Users and Computer or Apache Directory Studio. See the "Examples of LDAP filters for connecting to a directory service" section for more examples of filters and directories.
Now, you can validate the information by performing a connection test. To do this, click on the button shown in the following image:

To see possible errors that the connection test may display, refer to this section:
Connection test/domain configuration errors and warnings.
- Once done, save the settings made. Then, access the General > Synchronization section to configure the information that will be synchronized. To synchronize only user data, do not check the "Department and Position", "Access group" and "Team" options. However, it will not be possible to log in to the system without this information.
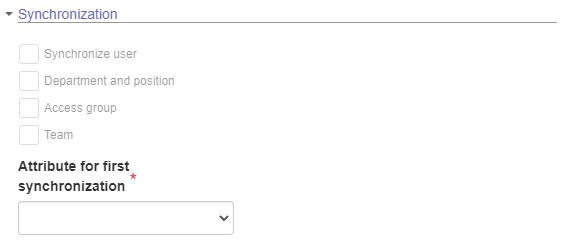
The Attribute for first synchronization field is used to link an existing user to a domain. When a record is returned with a value equal to that of the directory service, the internal user will automatically be linked to the domain and be authenticated with the credentials kept by the service. We recommend using the "User ID" field as an attribute for the first synchronization, as this is a field with a unique value for each user. However, other fields such as "Login", "E-mail" or "Name" can also be configured as an attribute for the first synchronization.
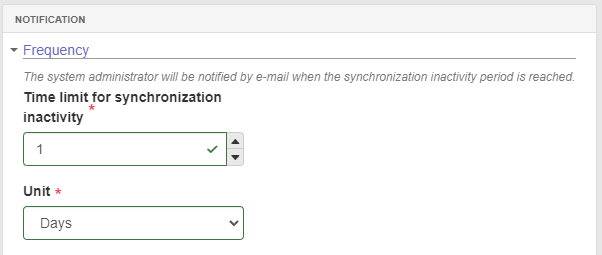
- In the next step, it is necessary to fill in the fields in **"Notification
Frequency"**. This setting will allow the administrator to be notified via e-mail if a communication error occurs during the synchronization process, which could result in the process being interrupted after the specified inactivity time.
- Use the "User synchronization" section to synchronize users:
User
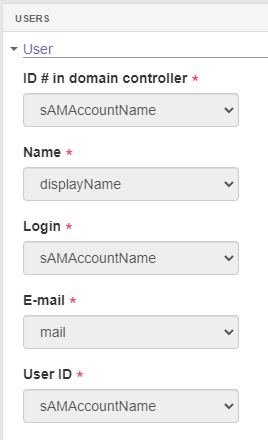
- ID on the domain controller: Specify the LDAP server attribute that will be used as user ID. When data is imported, the attribute selected in this field will be recorded in the database as the user's ID.
- Name: Specify the LDAP server attribute that will be used as user name. When data is imported, the attribute selected in this field will be registered in the database as the user's name.
- Login: Specify the LDAP server attribute that will be used as user login. When data is imported, the attribute selected in this field will be recorded in the database as the user's login.
- E-mail: Specify the LDAP server attribute that will be used as user e-mail. When data is imported, the attribute selected in this field will be recorded in the database as the user's email.
- ID: Specific the LDAP server attribute that will be used as user ID. When data is imported, the attribute selected in this field will be recorded in the database as the user's ID.
Leader
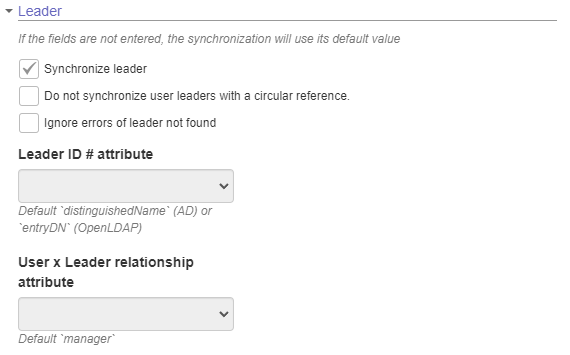
- Synchronize leader: Check this option to enable synchronization of the system users' leader link with the information configured in LDAP. By default, the system uses the "manager" field from the directory service to identify the leader and assemble the organizational hierarchy, through comparison with the "distinguishedName" field of each record returned in the query (these two attributes can be customized). In order for the link to be establish, both the user and their leader need to be listed in the query run using the specified filter and directory. Therefore, you must adjust the query to meet this requirement, or enable the "Ignore errors of leader not found" option if you wish to enable this function.
- Do not synchronize user leaders with a circular reference: Consider three users: A, B and C. Users A and B are each other's leaders, and B is C's leader. In this example, A and B would not be imported due to a circular reference, and C would also not be imported because their leader B could not be imported. By checking this option, the circular reference would be ignored, importing only A and B without a defined leader, but keeping B as the leader of user C, since the latter is outside of the circular reference.
- **Ignore errors of leader not found: **With this option, if leader synchronization is enabled and the user's leader is not contained in the list of users for synchronization, there will be no errors, and the user will be imported normally.
- Leader ID # attribute (optional): Used to get the ID # of a user who is a leader. By default, the system uses the "distinguishedName" attribute, or "entryDN" if the OpenLDAP connection type is being used.
Initial parameters
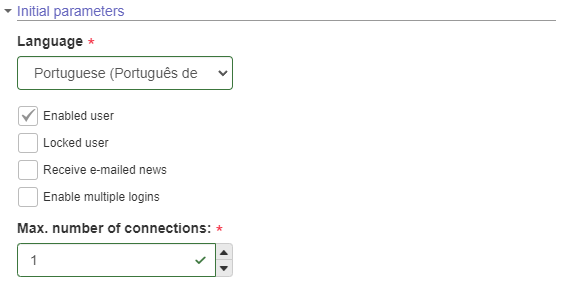
- Initial parameters: The initial parameters will only be applied when the user is created in SoftExpert Suite. These parameters will be used as defaults for all the users imported from the LDAP server. That is, the "Language", "Active user", "Blocked user", "Receive e-mailed news", "Enable multiple logins", and "Maximum number of connections" options will only be used on the first access of new users; therefore, they will not interfere with users already registered in SoftExpert Suite.
⚠️ Attention:
- All attributes that are available for selection are obtained directly from the directory service, using the search configured in the filter and directory. If any attribute that was expected is not available for selection, it is possible that no user with this attribute was returned. For example, in the e-mail field, the "mail" attribute was expected, but there is no such attribute for selection. In this case, it must be verified in the directory service whether there is any user with this field defined within the specified directory, following the rules set in the filter.
- In the Synchronization > Department and position section, departments and positions must be synchronized. To do this, fill in the following fields:
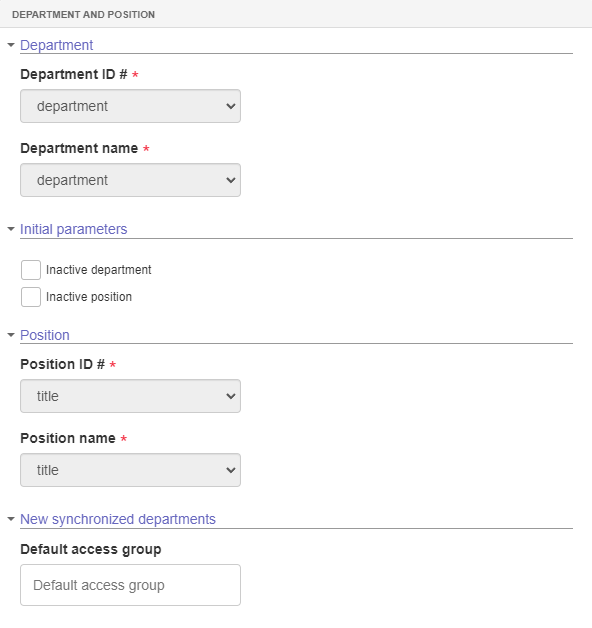
Department:
- Department ID #: Enter the LDAP server attribute that must be used as department ID #, that is, when data is imported, the attribute selected in this field will be recorded in the database as the ID # of a department.
- Department name: Enter the LDAP server attribute that must be used as department name, that is, when data is imported, the attribute selected in this field will be recorded in the database as the name of a department.
Initial parameters:
- Inactive department: The initial parameters will only be used when the department is created in SoftExpert Suite. This parameter will be used as the default for all departments imported from the LDAP server.
- Inactive position: The initial parameters will only be used when the position is created in SoftExpert Suite. This parameter will be used as the default for all positions imported from the LDAP server.
Position:
- Position ID #: Enter the LDAP server attribute that must be used as position ID #, that is, when data is imported, the attribute selected in this field will be recorded in the database as the ID # of a position.
- Position name: Enter the LDAP server attribute that must be used as position name, that is, when data is imported, the attribute selected in this field will be recorded in the database as the name of a position.
New synchronized departments:
- Default access group: This is the access group assigned by default to new synchronized departments. Department or position identifiers should not exceed 50 characters. If they do, they will be truncated and incremented with a sequential value to maintain compatibility and prevent problems. Keep identifiers within a 50-character limit to ensure data integrity.
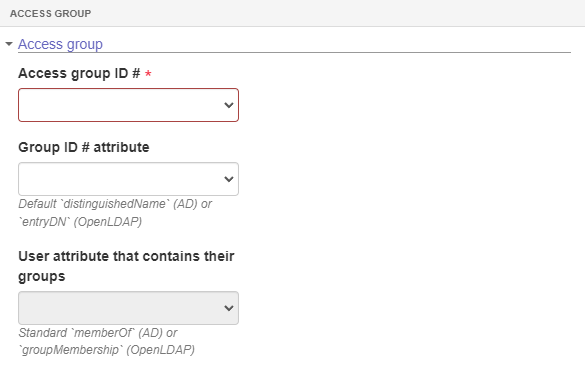
- In the Synchronization > Access group section, it is necessary to define the attribute of the LDAP server groups that will be used as ID # to create the link with the respective access groups in SoftExpert Suite. Group synchronization does not create access groups in SoftExpert Suite; it only links groups that already exist in the system with groups from the directory service that have the same ID #. Additionally, users who are members of these groups in the directory service also become members of the access groups in SoftExpert Suite.
- In the Synchronization > Team section, teams must be synchronized, finishing the configuration. To do this, fill in the following fields:
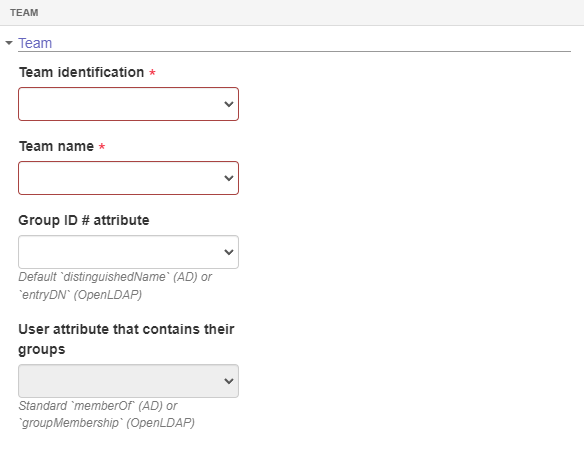
Team:
- Team ID #: Select the LDAP server attribute that will be used as team ID #. This attribute will be recorded in the database as the ID # of a team during data import.
- Team name: Enter the LDAP server attribute that will be used as team name. This attribute will be recorded in the database as the name of a team during data import.
Team identifiers should not exceed 50 characters. If they do, they will be truncated and a sequential value will be added.
-
Save the configurations set so far and close the screen.
-
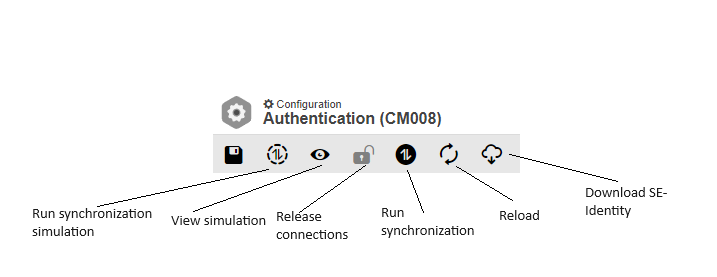
On the Authentication (CM008) screen, click on the "Synchronize" button to perform a synchronization simulation, without making changes to SoftExpert Suite. The system will notify when it is done sending the data. To view the synchronization simulation, click on the "Preview" option in the notification or use the "View" button on the toolbar.
To release the connections and allow effective synchronization, click on the padlock toolbar button and confirm the system request. This will unblock the domain, enabling the "Synchronization" button for the synchronization to be performed in the system.
From this moment, you can start synchronization and track the process. Each synchronization generates a record in the user and team synchronization history (if enabled), providing information on current status and number of processed records. To monitor synchronization in real time, click on the "Synchronization" button.
- In the User synchronization history section, you can see the last 10 synchronization records.
The synchronization may have the following statuses: "Executing", "Executing with errors", "Loading AD information", "Loading SoftExpert Suite users", "Comparing the users of SE Suite with the users of AD", "Calculating permissions of users", "Finished", and "Finished with errors". The "Calculating permissions of users" status indicates that new users are being added, and the system is creating the access permissions structure for them. This step may take a while depending on the number of new users. The progress of the user permission processing can be tracked in the "With permission" column. Statuses reporting errors refer to users with missing information, invalid formats, or conflicting information, and the reason for the error can be seen in the import details. To see the import details, including users with errors, updated, imported and disabled, select the desired record and click on the View button.
⚠️ Attention:
- For more details on possible errors that may occur during the user synchronization process and to learn how to solve them, refer to the Connection test/domain configuration errors and warnings section. There you will find useful information to solve any problems that may arise during synchronization.
-
The Team synchronization history section is similar to the User synchronization history section, but with specific details for teams. Here you can see teams with errors, updated teams, imported teams, and teams disabled during the synchronization process. This information will help you monitor and track the status of teams over time.
-
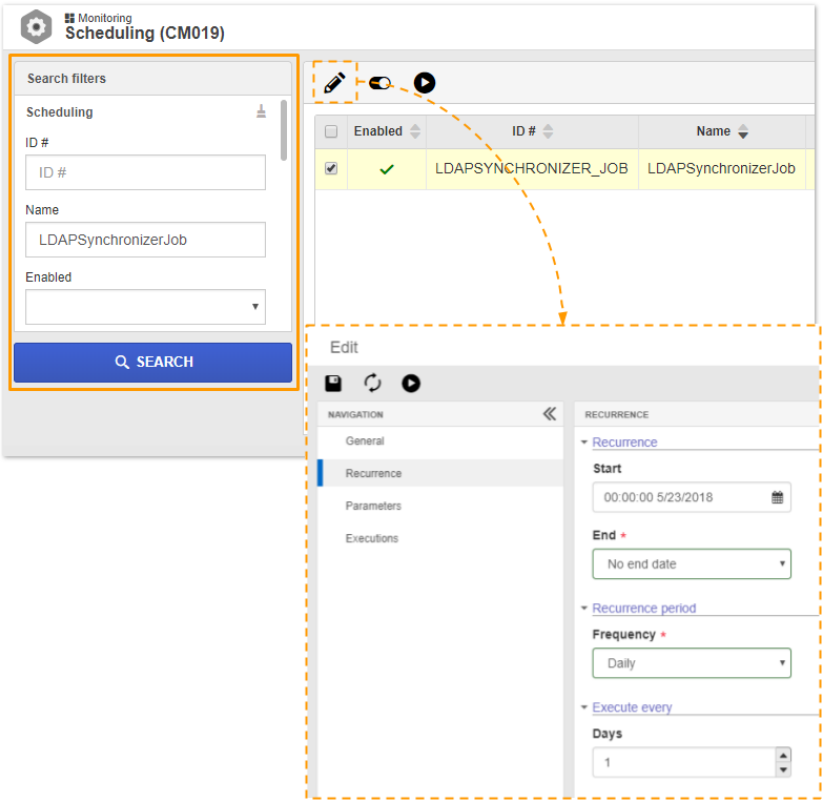
When synchronization scheduling is enabled, the process will be executed daily at midnight, intermittently. If you need to change the recurrence, you can access the Monitoring > Scheduling (CM019) menu and search for the name "LDAPSynchronizerJob". There you can make the necessary adjustments to customize the synchronization frequency and time as you prefer.
- In SoftExpert Suite, there is a configuration that allows authentication via SAML for users who are not linked to a domain. This configuration, called Enable integrated authentication for users that are not synchronized is located on the Configuration > Authentication (CM008) screen, on the left side menu, in Directory integration > General options.
This configuration was developed for scenarios in which there is no user synchronization via LDAP or SCIM with SoftExpert Suite, but it is necessary to authenticate users manually registered in SoftExpert Suite through a platform that uses SAML, such as Azure, Okta, and others.
To use this configuration, you must activate the Enable integrated authentication for users that are not synchronized option and configure SAML in SoftExpert Suite through the Configuration > Authentication (CM008) screen.
⚠️ Attention:
When the Enable integrated authentication for users that are not synchronized configuration is activated, the following conditions apply:
- Users manually registered in SoftExpert Suite, without provisioning via LDAP or SCIM, can be edited manually, including the access password.
- Users have the single sign-on via SAML option if SAML is configured on the Configuration > Authentication (CM008) screen, and if they are registered on the platform that uses SAML. They can also choose to log in using the password created in their SoftExpert Suite record.
- Login with single sign-on will use the password created for the user on the SAML platform (such as Azure, Okta, among others), while login with username and password (without single sign-on) will use the password and login of the user registered in SoftExpert Suite.
- The Single Sign-On option on the SoftExpert Suite login screen takes priority. This means that, if the User and Password fields are filled in on the SoftExpert Suite login screen, and the Single Sign-On button is clicked, values entered in those fields will be ignored.