Authentication in Microsoft Azure via SAML 2.0
SoftExpert Suite supports single sign-on via SAML 2.0 on Microsoft's Azure platform, with approval. Microsoft Azure is a cloud computing platform for running applications and services. The concepts and operation of authentication on this platform are very similar to the model presented previously, with the difference being in the order in which metadata files are exchanged between the system and the service (in Azure, the SE Suite metadata file must be generated first) . See below how to configure authentication via SAML 2.0 in Azure:
- To configure user authentication via SAML, access the Configuration component > Configuration > Authentication (CM008) > Authentication Options" and check the SAML 2.0 option.
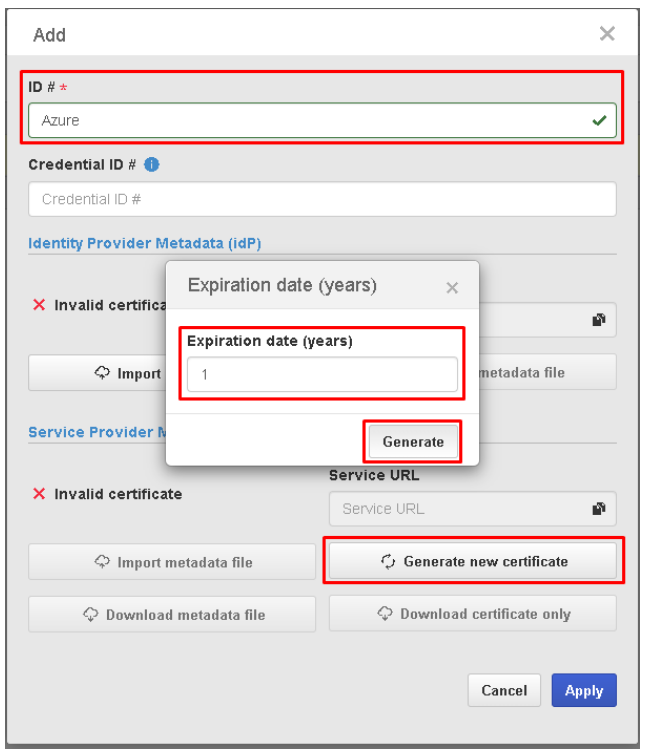
- Then, from the side menu, select "Authentication services > SAML 2.0" and add a new configuration. On the screen that will open, enter an ID for this configuration in the ID field. Click on the "Generate new certificate" button, enter the desired validity period for the certificate, and click on "Generate" to generate the certificate.
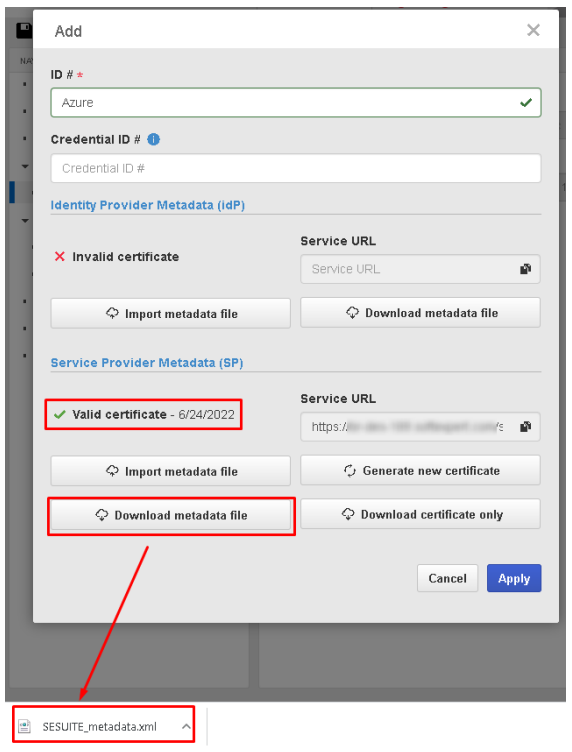
- In the "Service Provider Metadata (SP)" section, click on the "Download metadata file" button to download the metadata file. Save the configuration by clicking on "Apply".
⚠️ Attention:
- The identity provider metadata file will be uploaded later on this same screen.
- If the "SAML 2.0" menu is disabled, check whether the "SAML 2.0" field is checked in the "Authentication Options" section.
- Then, access Azure Active Directory and follow the settings described below:
⚠️ Attention:
- Before proceeding with the configurations, make sure you have an enterprise application registered in Azure Active Directory. If you do not yet have a registered application, see the instructions in "Configuring provisioning via SCIM with the Azure Active Directory platform" or Configuring an enterprise application in Azure Active Directory. .
- In Azure Active Directory, go to the "Enterprise applications" menu in the left side panel.
- Select "All applications" to list all registered enterprise applications.
- Locate the enterprise application for which you want to configure SAML 2.0 authentication.
- Select the enterprise application and then, from the left side menu, access "Single sign-on" and select the SAML method.
- Then, click on "Upload metadata file", load the "SESUITE_metadata.xml" metadata file, which was previously downloaded by SoftExpert Suite on the SAML 2.0 configuration screen. Click on "Add" to add the file. Note: If the file has two identical URLs, you will need to remove one of them before saving.
After that, the "Identifier" (Entity ID), "Reply URL" (Assertion Consumer Service URL) and "Logout URL" fields in the "Basic SAML Configuration" section will be automatically populated, ending with "…/softexpert/selogin", "…/softexpert/saml" and "…/softexpert/selogin/samlsso", respectively.
- After loading the metadata file, click on the "Download" link, in the "SAML Signing Certificate" section, in "Federation Metadata XML", to download the settings.
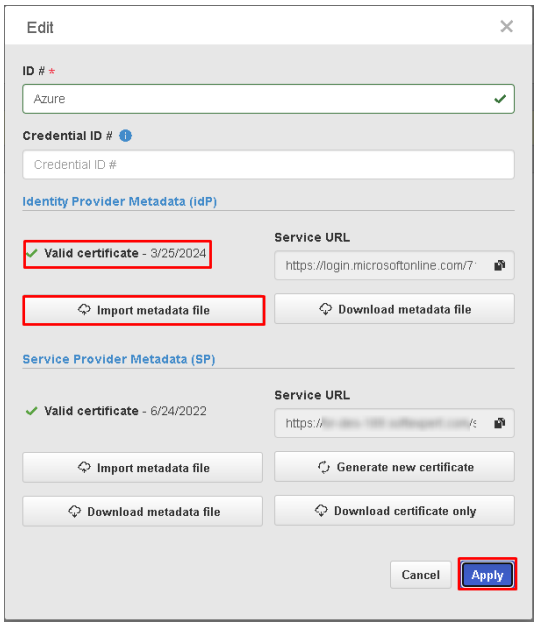
- In SoftExpert Suite, access the "Configuration component > Authentication"(CM008), find the SAML configuration and edit it. In "Identity Provider Metadata", click on the "Import metadata file" button and select the XML configuration file obtained from Azure. Save the configuration.
- Next, configure the attribute that will be used by Azure to authenticate via SAML 2.0 with the login of the user registered in SoftExpert Suite, on the single sign-on screen.
By default, SoftExpert Suite uses the attribute configured in the "Unique User Identifier (Name ID)" field in the claim name to authenticate users in single sign-on via SAML 2.0.
It is important to check whether the attribute configured in the "Unique User Identifier (Name ID)" claim name is the same attribute used as login in user provisioning (LDAP, SCIM, Web Service, etc.) or in manual user registration in SoftExpert Suite. If they are not the same, change the attribute of this claim or create a new claim and configure it later in the SAML 2.0 registration in SoftExpert Suite.
To create a new claim in Azure, follow these steps:
- Select the desired enterprise application in Azure.
- Access the "Single sign-on" menu of the enterprise application.
- In the "User Attributes & Claims" section, click on "Edit" to edit the settings.
- Then click on "Add new claim" to add a new claim.
- Enter the desired name for the new claim and select the desired attribute for it.
In SoftExpert Suite, to configure single sign-on with a new claim, you must enter the name of this new claim in the "CredentialID" field, in the SAML 2.0 configuration.
⚠️ Attention:
- Regardless of the provisioning type used (LDAP, SCIM, Web Service, among others), or the manual registration of users directly through SoftExpert Suite, the attribute configured for authentication in the SAML configurations of the enterprise application in Azure Active Directory must be equivalent to the value recorded in the SoftExpert Suite user login. Make sure both attributes are aligned to ensure correct authentication.